Introduction
Jlpt Submission System is an online application service which receive application form(s) for JLPT exam which applied by an individual applicant. Moreover, at the admin site, user can create new test term to define application form submission date, exam date, test voucher issue date and test places. User can also allocate seat for the exam at the test site and can also do finalization to check test term is ready for the exam or not. Besides, at the admin site, user can generate application form to delivery to the related party and can also generate reports related with payment and application. User also can modify application form.
1. Administration
1.1 User management
Administrator can manage user access for system with various authority on user management function.
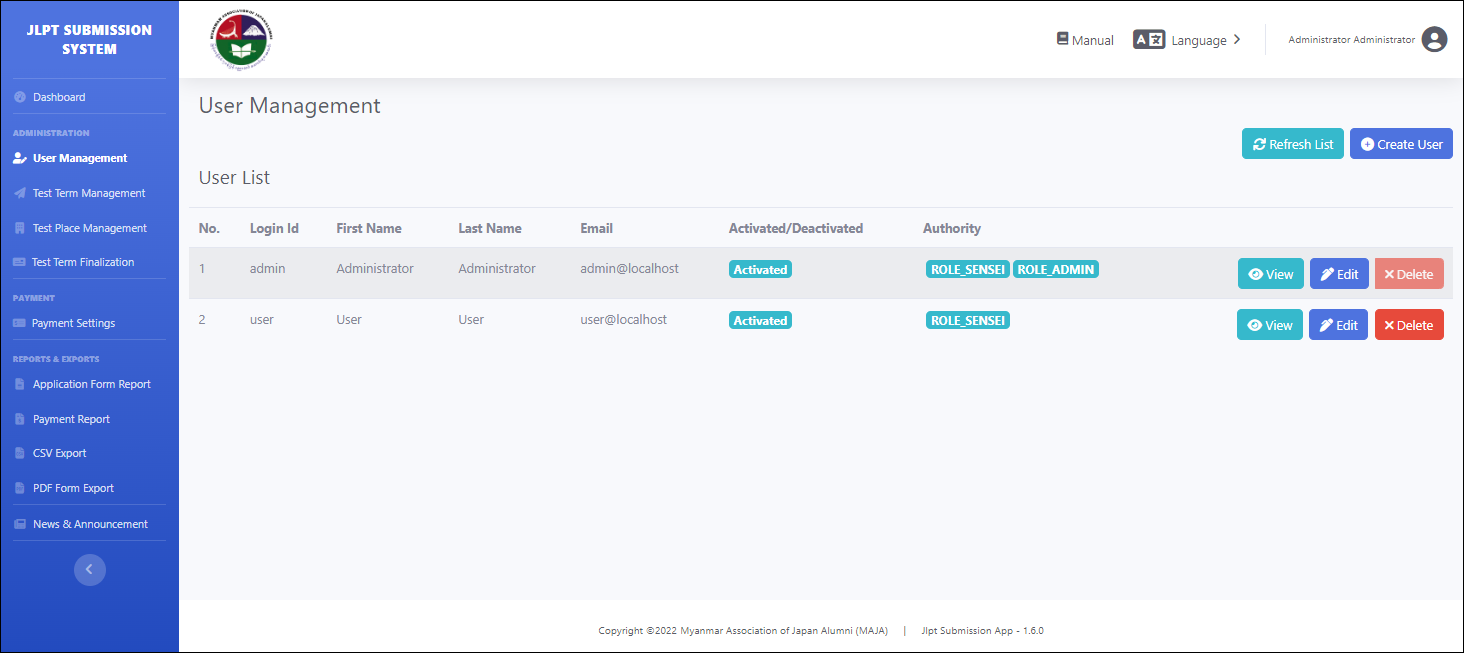
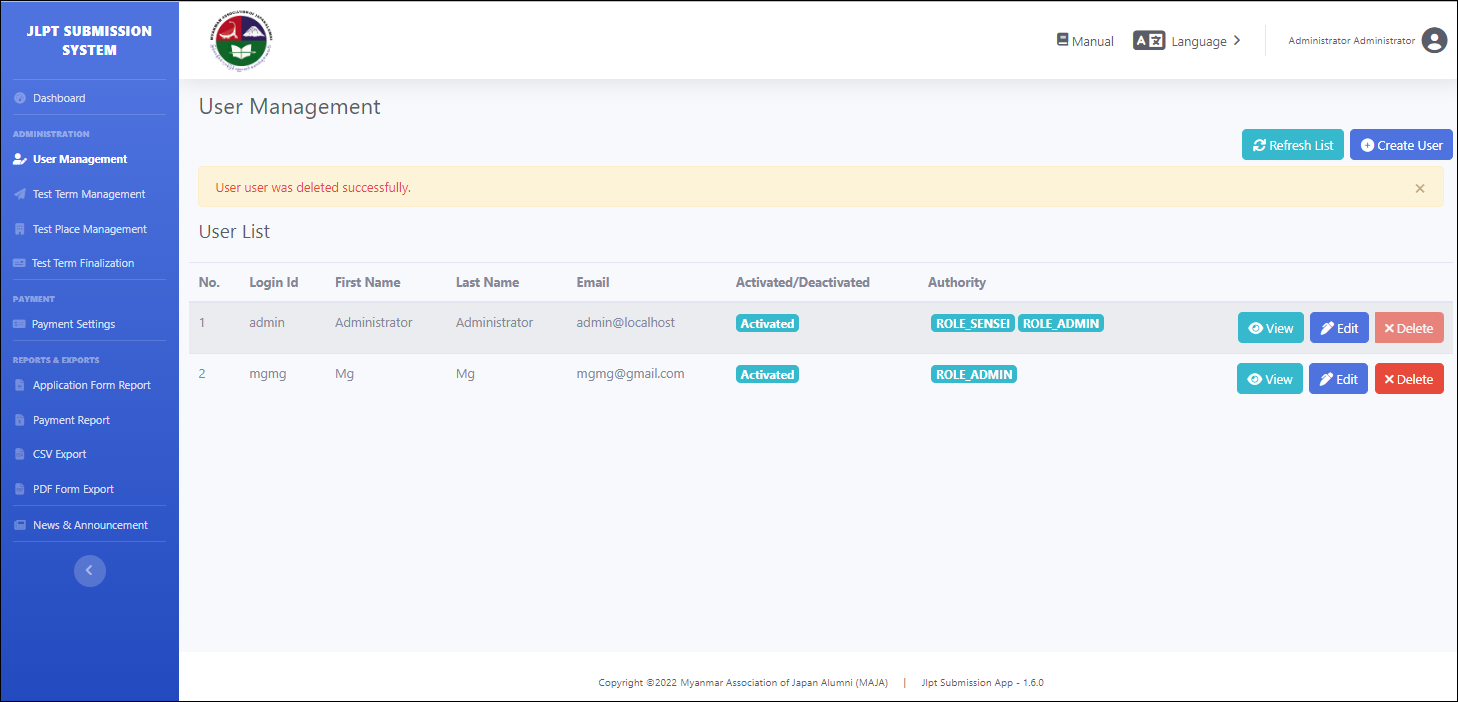
By clicking "User Management" from navigation menu, user can see "User Management" page. At that page, administrator can see user list and then can view, edit and delete the existing user.
Administrator can also create new user by clicking "Create User" button.
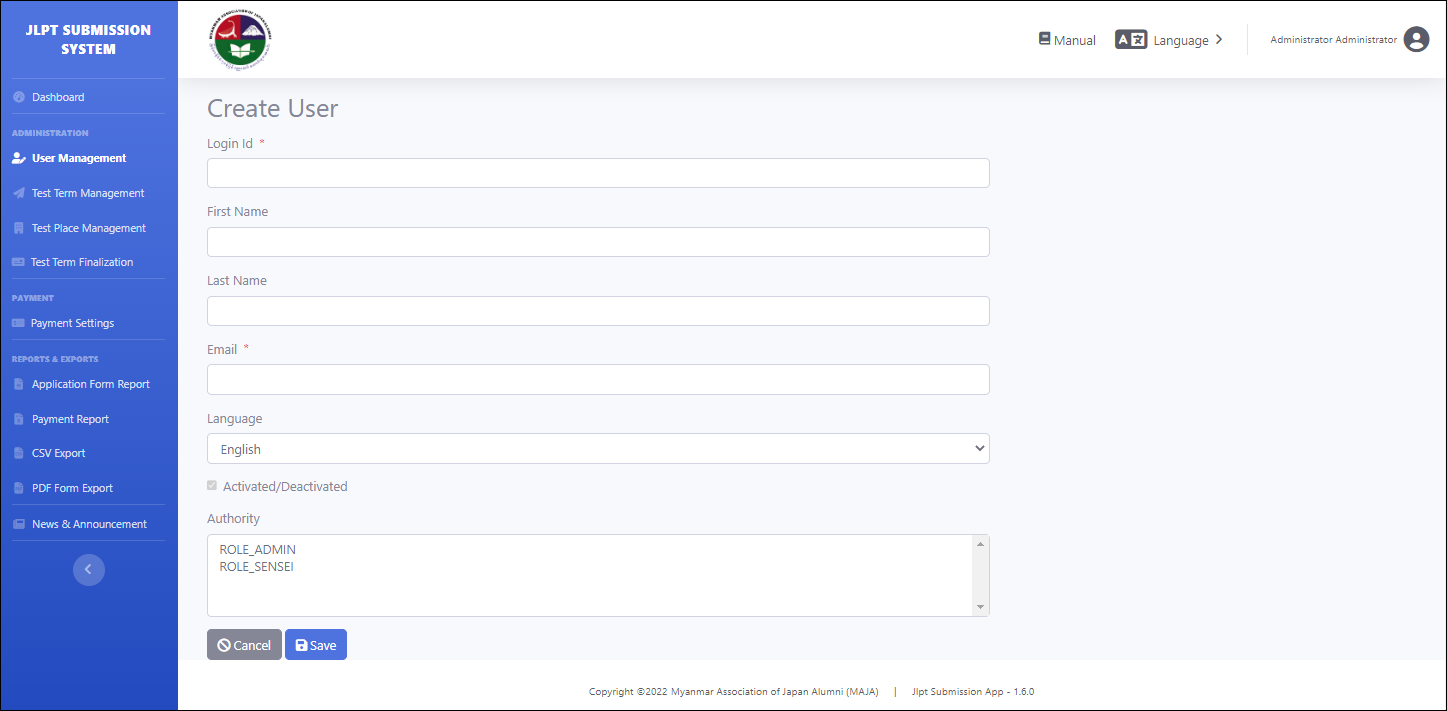
After clicking “Create User” button, "Create User" page will be displayed. System user must fill the required information to create new user. Label name with red star are mandatory/required fields.
(1) Login Id : User need to fill this field. This Id will be used when login the system.
(2) First Name : User can fill this field which will display at the upper right side of the system after login.
(3) Last Name : User can fill this field which will display at the upper right side of the system after login.
(4) Email : User need to fill this field to receive password change link mail.
(5) Language : User can choose language (English, Myanmar and Japanese) from dropdown list.
(6) Activated/Deactivated : User can check "Activated" or "Deactivated".
-
If user un-check this field of target user, that target user cannot login the system.
-
If user check this field of target user, that target user can login and use the system again.
(7) Authority : User can choose role (ROLE_ADMIN/ROLE_SENSEI) for new user.
-
ROLE_ADMIN role is the highest role in this system and can create new user, test term, test place and test term finalization. Moreover, admin role user can also access pages which SENSEI role user can access.
-
ROLE_SENSEI role user can view, download reports and modify applicant data.
After create the new user, "User was created successfully" message will be displayed.
After that, password change link will be sent to user’s email which input at the Email field and user needs to change password from that link.
Note: If user does not change password, user could not login to system.
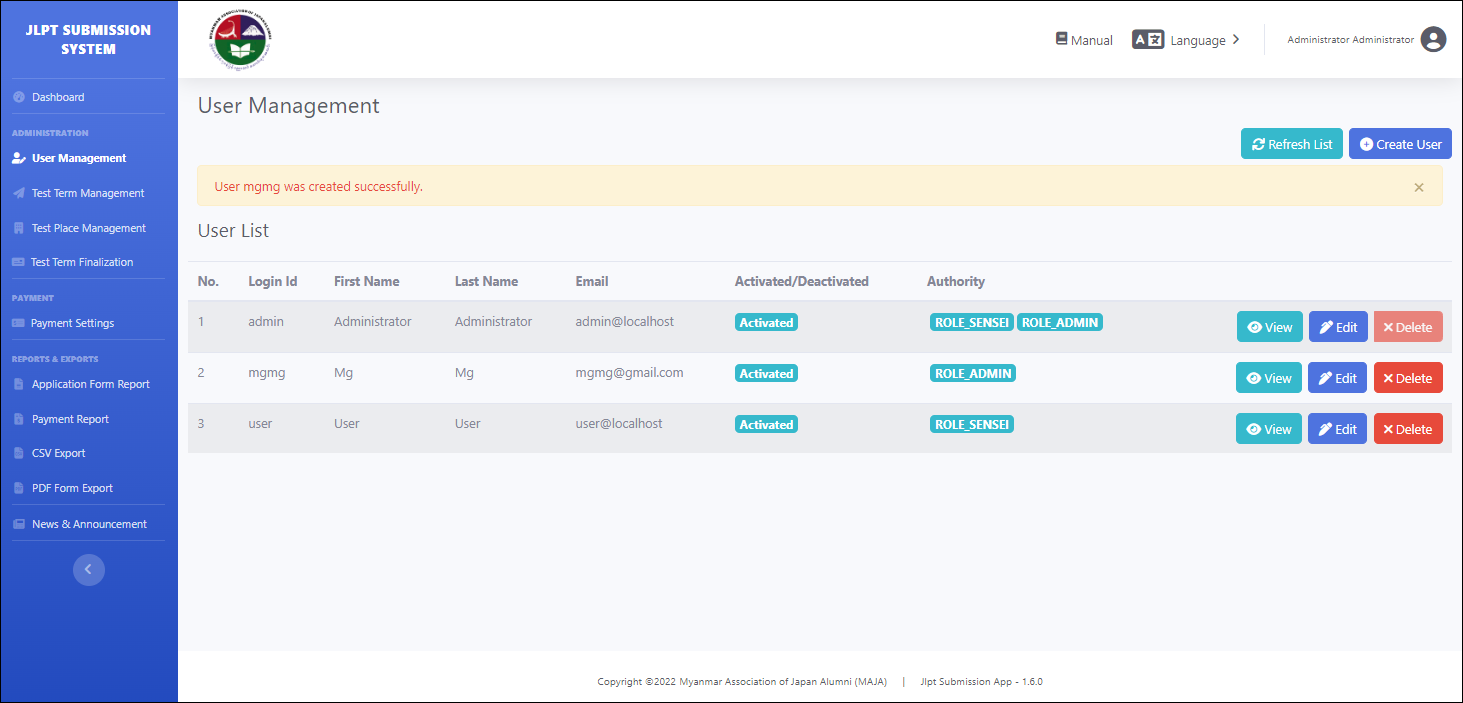
By clicking "Edit" button, the user’s information is editable. And By clicking "Delete" button, "Are you sure to delete" popup will be displayed. Administrator can also view detail information of user by clicking "View" button.
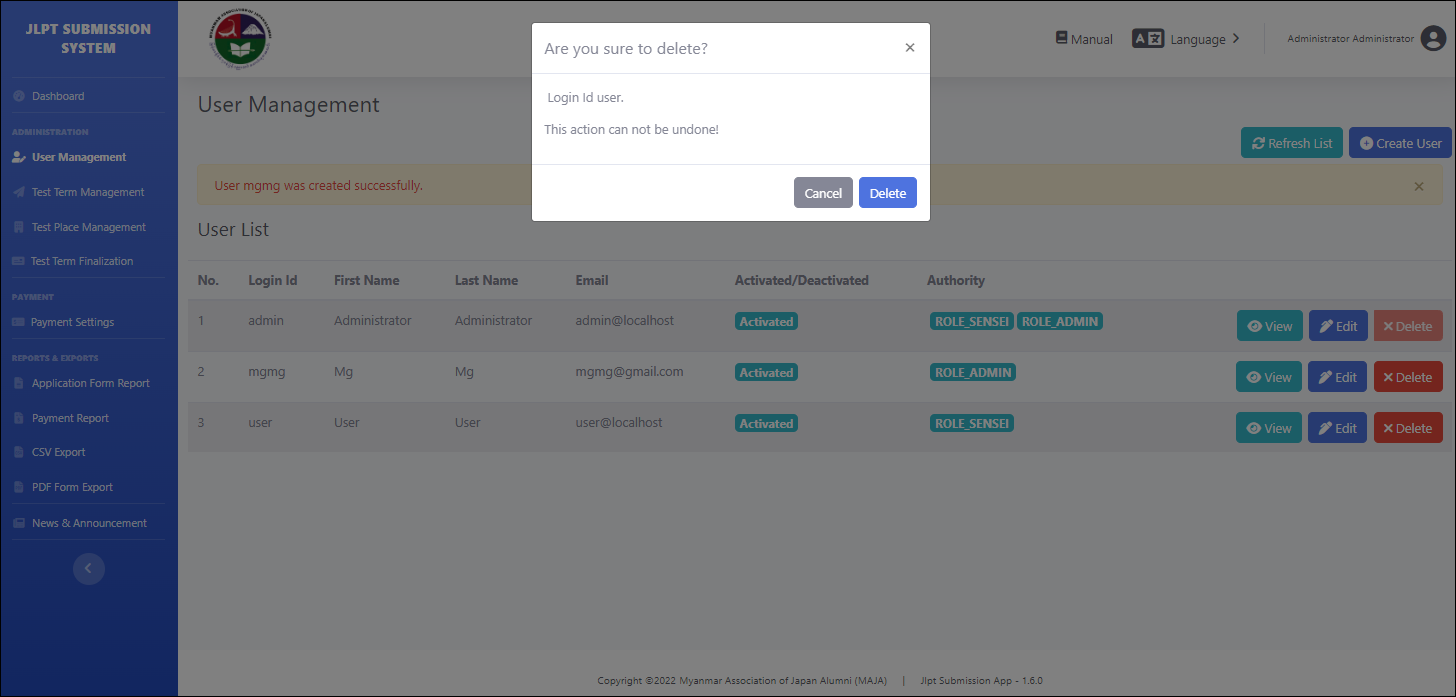
After clicking delete button, 'User <User Id> was deleted successfully.' message will be displayed.
1.2 Test Term management
To create new JLPT exam, user need to prepare test term information such as exam form submission date, test voucher issued date, exam date, exam fee and test side information.
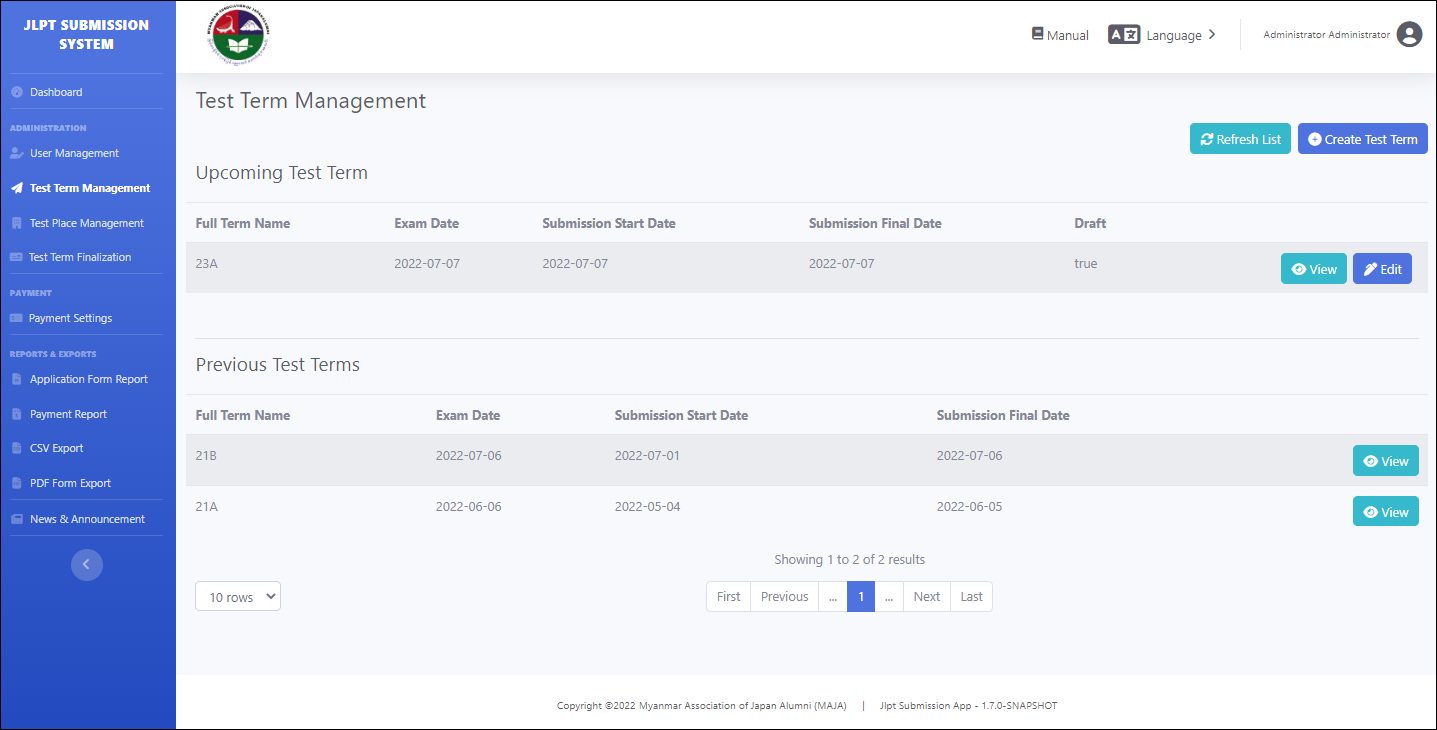
By clicking "Test Term Management" from navigation menu, "Test Term management" screen will be displayed. At the screen, user can see two (2) parts.
(1) Upcoming Test Term which is displayed current test term information. If there is no upcoming test term, "No test term found" message will be displayed and user can create new test term by clicking "Create Test Term" button.
(2) Previous Test Term which is displayed for exam information that has already done. If exam date of test term is less than today date, that test term will be displayed at the "Previous Test Terms". If there is no previous test term, "No previous test term found" information will be displayed.
Note: There must be only one "Upcoming Test Term". User cannot create new test term if current test term has not finished yet.
Moreover, if there is upcoming test term data, user can view detail test term information by clicking "View" button and user can also modify test term information by clicking "Edit" button.
If there is previous test terms data, user can view previous test term information.
1.2.1 Create Test Term
When clicking "Create Test Term" button, "Create Test Term" screen will be displayed.
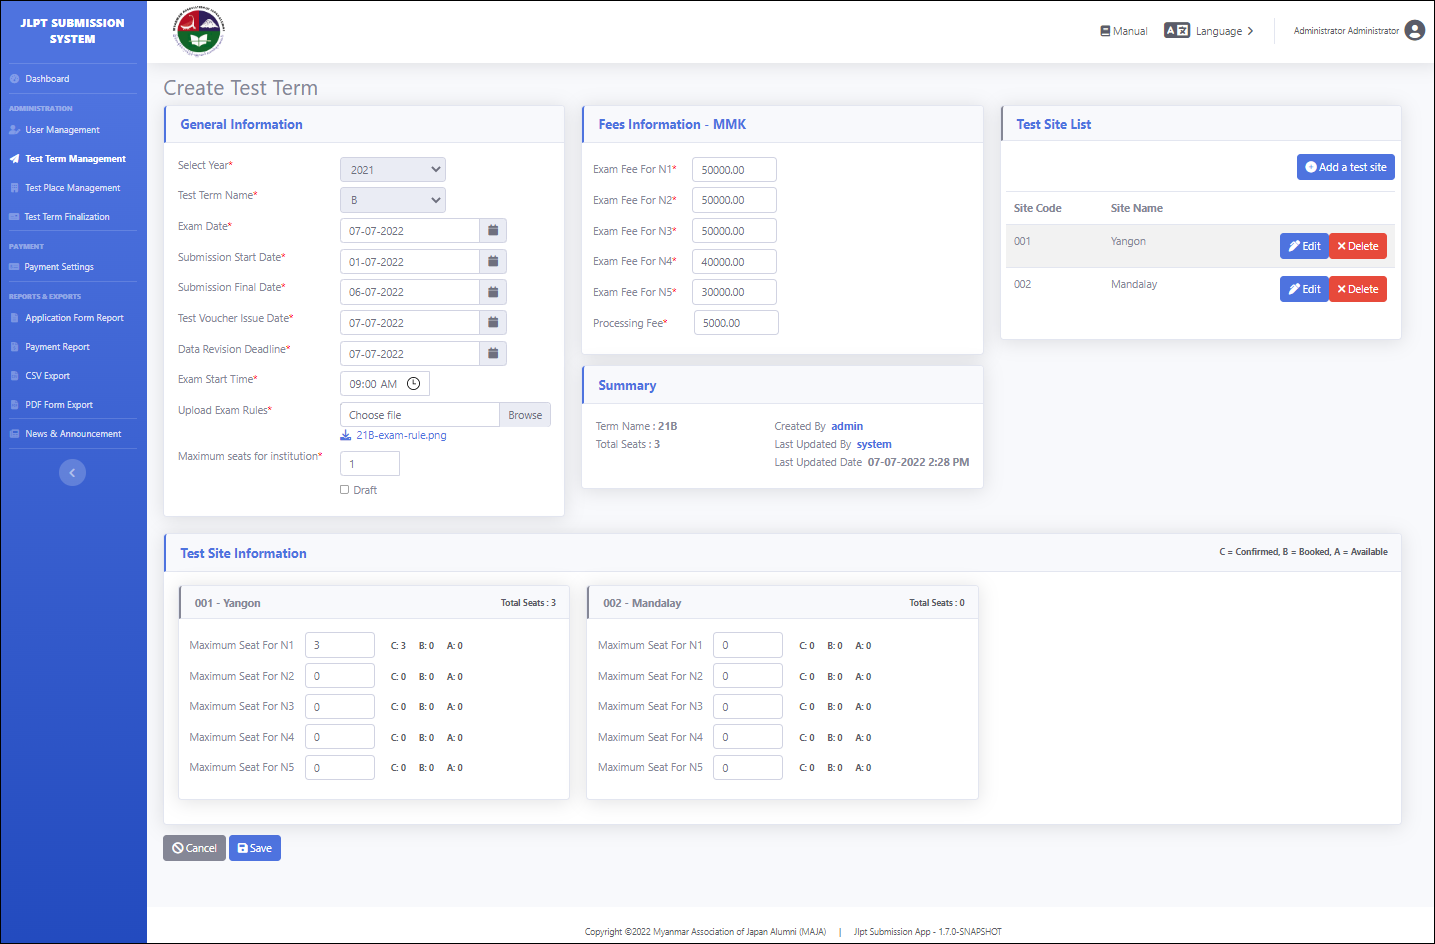
In this screen, user can see four (4) parts to register.
(1) General Information
(2) Fees Information - MMK
(3) Test Site List
(4) Summary
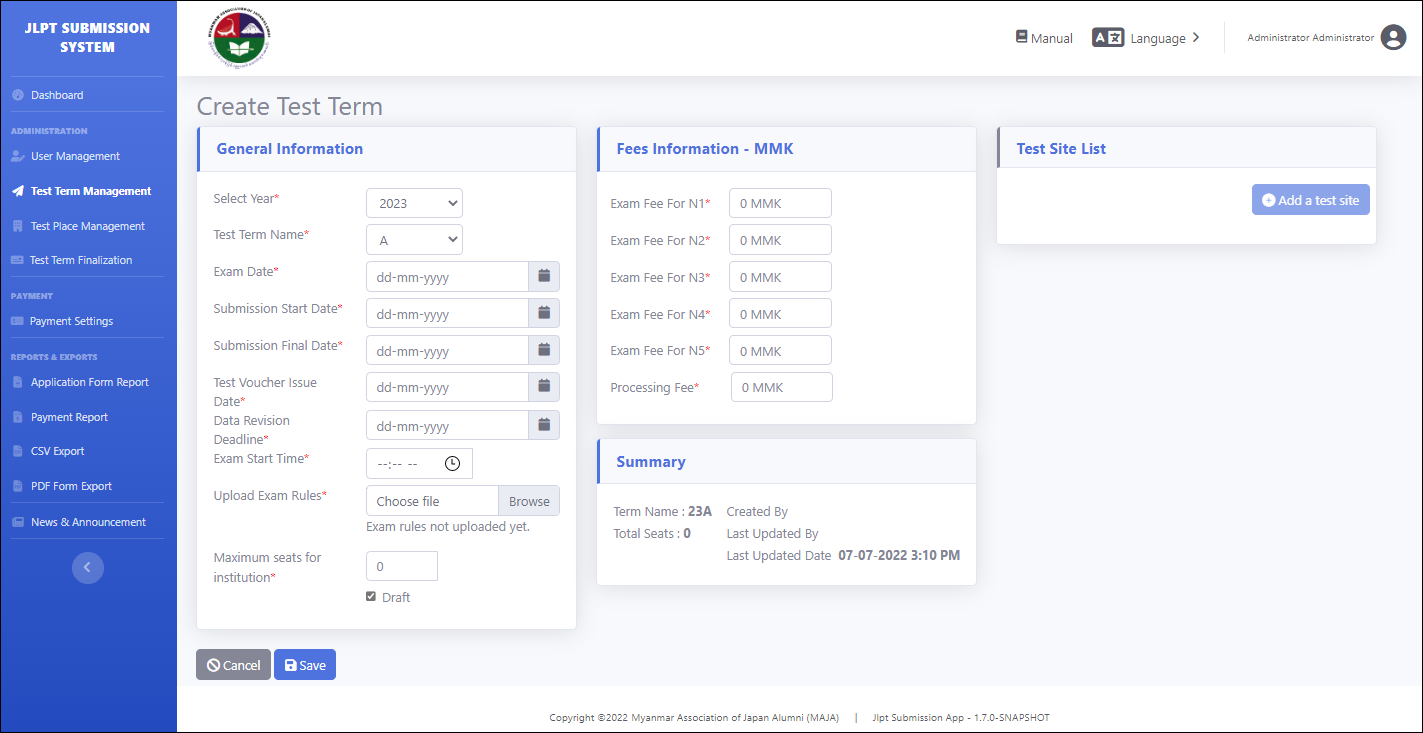
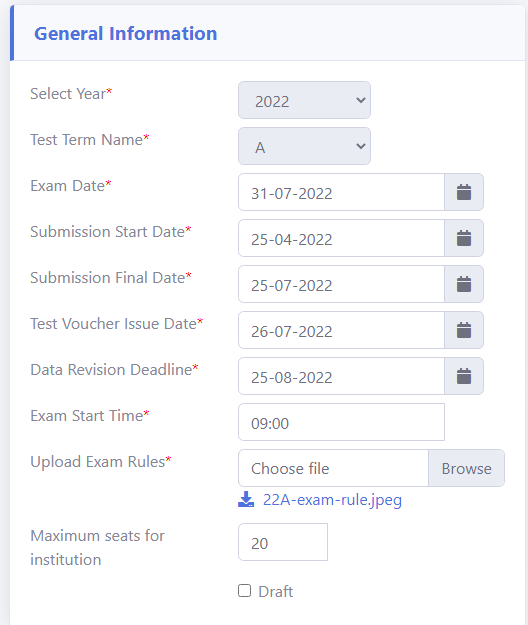
(1) General Information
User need to fill the following general information fields when creating new test term. Label name with red star are mandatory/required fields and user need to fill data for those fields.
(1.1) Selected Year : User need to fill exam year.
Note : Year will be increased automatically at 2:00 AM of 1st January of every year.
(1.2) Test Term Name : User need to fill the name of test term.
Note : There are two (2) test terms (A, B) in each year.
(1.3) Exam Date : User need to fill the date that exam will hold.
Note: Exam Date must be greater than Submission Final Date and Test Voucher Issue Date.
(1.4) Submission Start Date : User need to fill the start date of receiving the application form.
(1.5) Submission Final Date : User need to fill the end date of receiving the application form.
Note: Submission Final Date must be greater than Submission Start Date.
(1.6) Test Voucher Issue Date : User need to fill the date that generate test voucher.
Note: Admin user need to do finalization to generate test voucher even "Test Voucher Issue Date" is reached. If not, applicants cannot get test voucher.
(1.7) Data Revision Date : User need to fill the exam data revision date.
(1.8) Exam Start Time : User need to fill the time of the exam.
(1.9) Upload Exam Rule : User need to upload the exam rule.
(1.10) Maximum seats for institution : User need to fill the maximum seats for the exam.
(1.11) Draft : User can un-check this field after creating test site.
If user check this test term information, applicant cannot apply the application form even the "Submission Start Date" is reached.
If user uncheck this field, the system allows applicant to apply application form when "Submission Start Date" is reached.
Note: All date from "General Information" must not be less than current date and date format must be "dd-mm-yyyy".
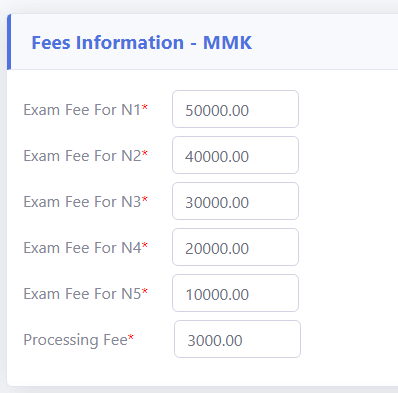
(2) Fees Information - MMK
User need to fill fees information for each test level and processing fee in this part. Label name with red star are mandatory/required fields. User must fill data for those fields.
Note: If there is no exam for some level at current test term, user need to fill "0" at those fields.
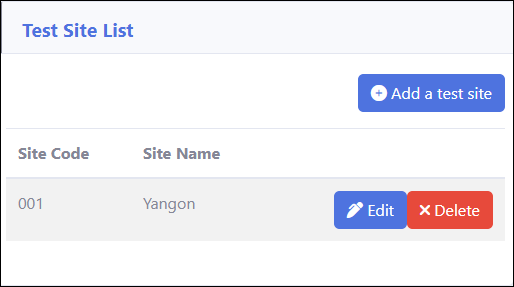
(3) Test Site List
User could not register test site during the process of creating new upcoming test term. After creating new upcoming test term, user can register new test site by clicking "Add a test site" button at “Test Site List”.
(4) Summary
System display latest summary information of the test term. That will include test term name, number of total seat, who create the test term, who update the test term and when the last update.

After filling the required data in general information and fees information, user can create the test term by clicking "Save" button. If user do not want to create the test term, can cancel it by clicking "Cancel" button.
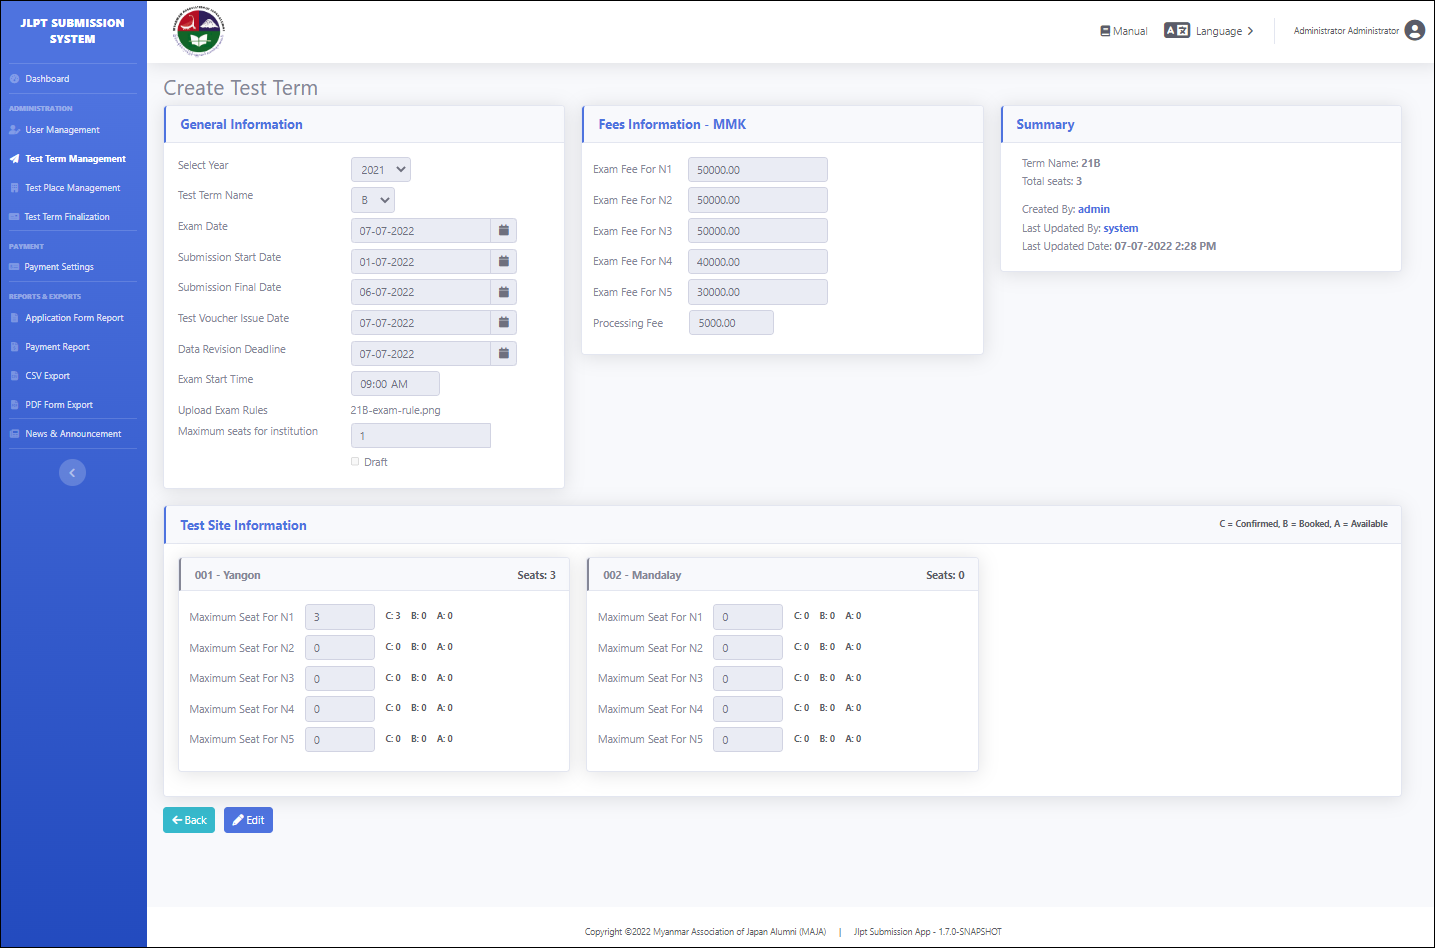
1.2.2 Edit Screen of Test Term Management
User can edit Exam Date, Submission Start Date, Submission Final Date, Test Voucher Issue Date, Data Revision Date, Exam Start Time, Maximum seats for institution, upload exam rules and Draft checkbox of general information and all data of fees information.
If there is no test site yet, user can create the test site in "Test Site List" part and if the test site has already been created, user can edit or delete.
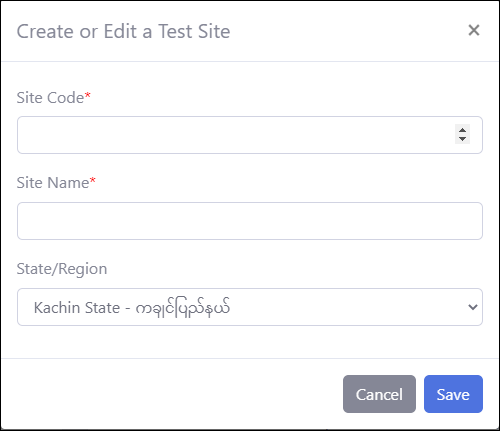
For creating the new test site, click "Add a test site" button and then "Create or Edit a Test Site" pop-up form will be displayed.
When clicked "Add a test site" button after creating test term, "Create or Edit a Test Site" popup page will be displayed. User need to fill the following fields to create new test site. Label name with red star are mandatory/required fields. User must fill data for those fields.
(3.1) Site Code : User need to fill site code of the exam.
(3.2) Site Name : User need to fill site name of the exam.
(3.3) State/Region : User need to choose state or region of the exam.
After filled the above data, user can click "Save" button to save test site or user can click "Cancel" button to cancel the data. For existing test site, user can edit or delete the data by clicking related button.
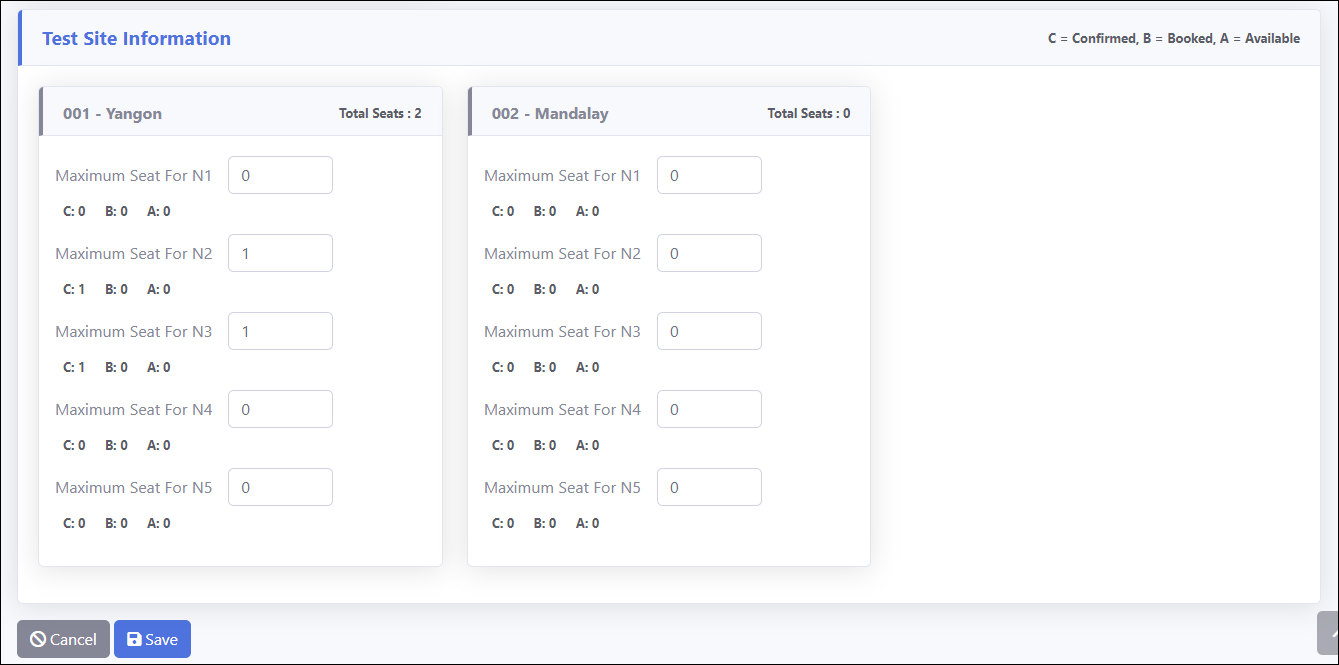
After creating the test site, "Test Site Information" part will be displayed and user can define maximum numbers of seat for each test level of each test site. The system show seats' information in three conditions (Confirmed, Booking and Available). “Confirmed” is a condition when applicant finished payment for submitted application. “Booking” is a condition when applicant is in process of payment for submitted application. "Available" shows the number of seat for new application which can apply.
After editing the test term, click "Save" button and the data will be updated into system. User can click “Cancel” button without saving and go back to “Test Term Management” screen.
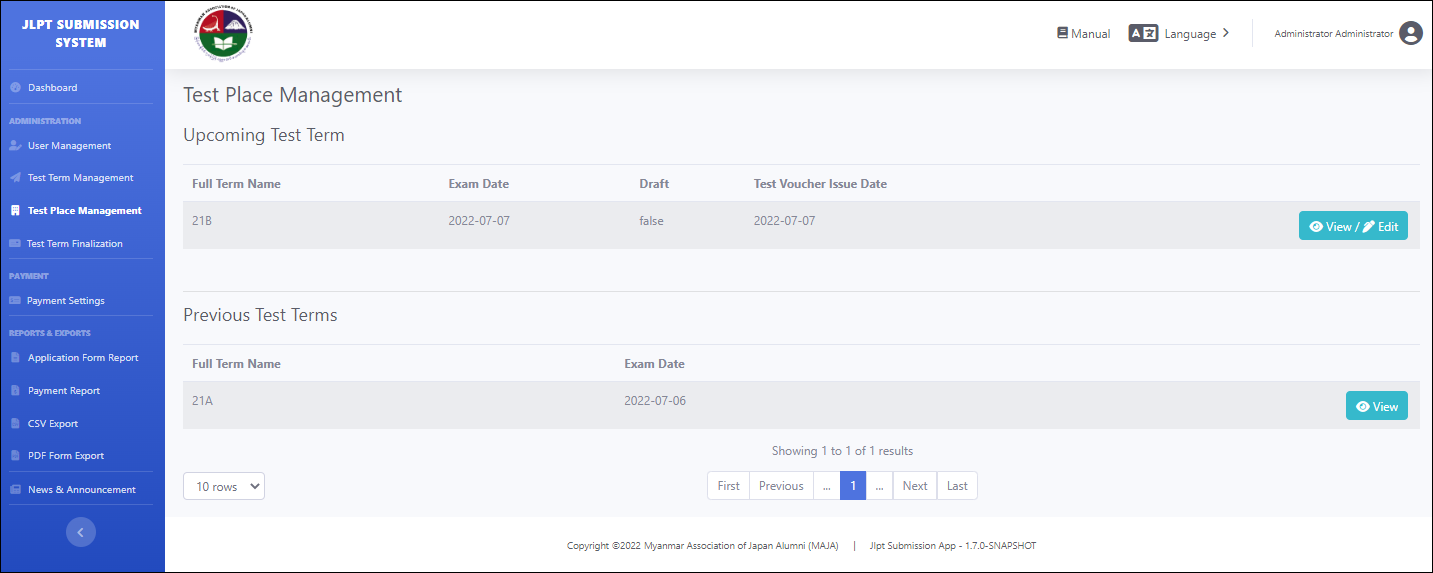
1.3 Test Place management
After defined the test term and also test site, user can create the test place for each test site. And then, user can also arrange test place for each JLPT test level according to number of seats.
User could see two types of test terms "Upcoming Test Term" and "Previous Test Terms".
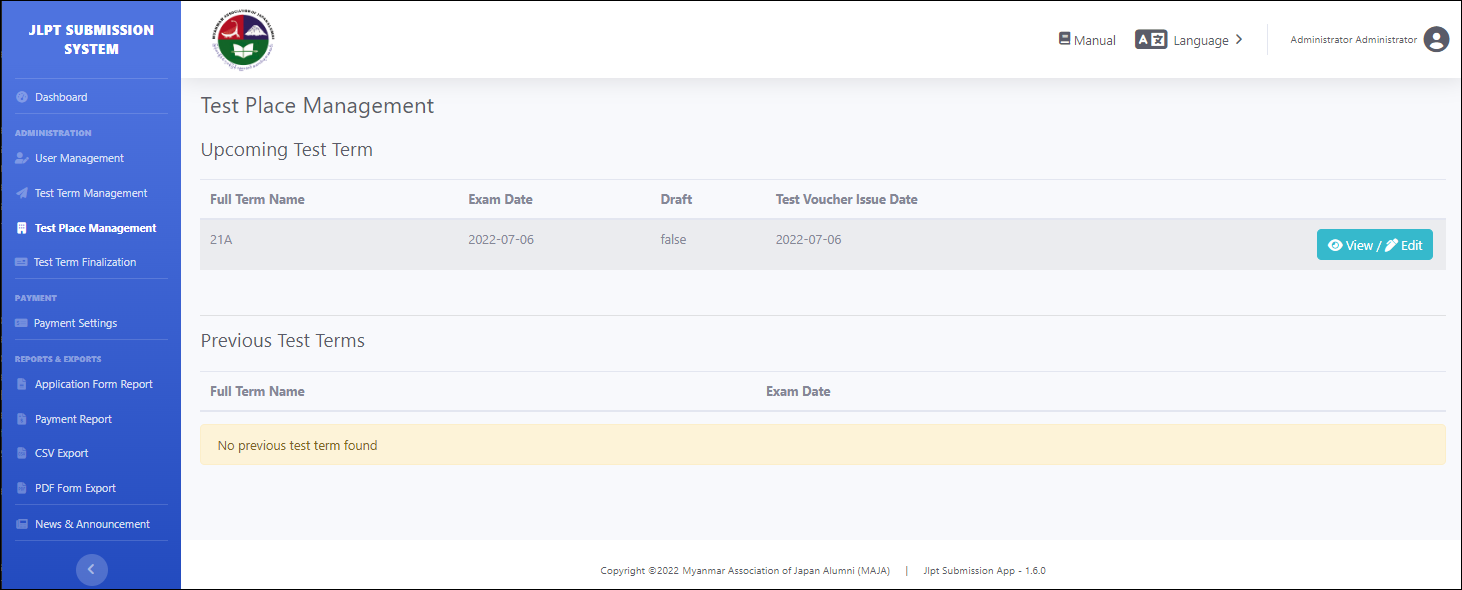
1.3.1 Upcoming Test Term
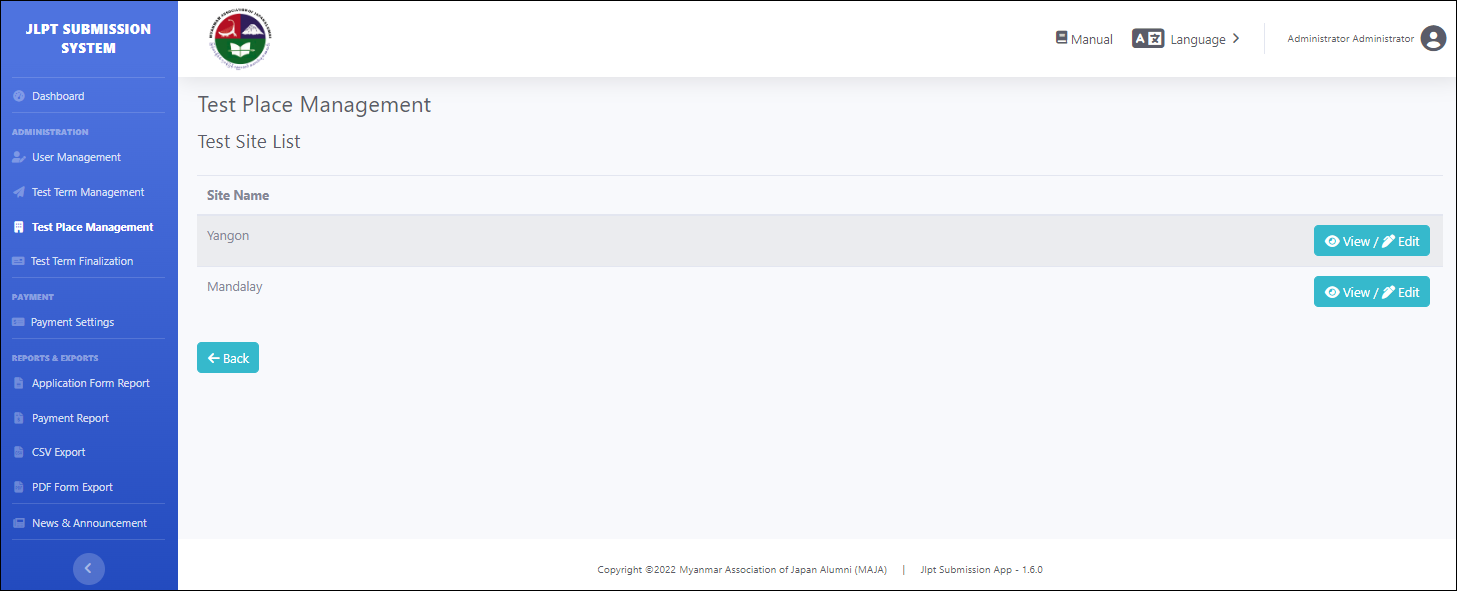
At the exist "Upcoming Test Term", user can view or edit the test place information for the upcoming test term. By clicking “View/Edit” button, “Test Site List” screen will be displayed. If there is no created upcoming test term, “No test term found” information will be displayed.
1.3.1.1 Test Site List
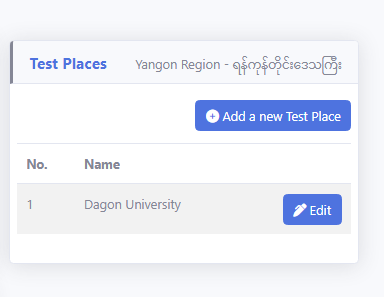
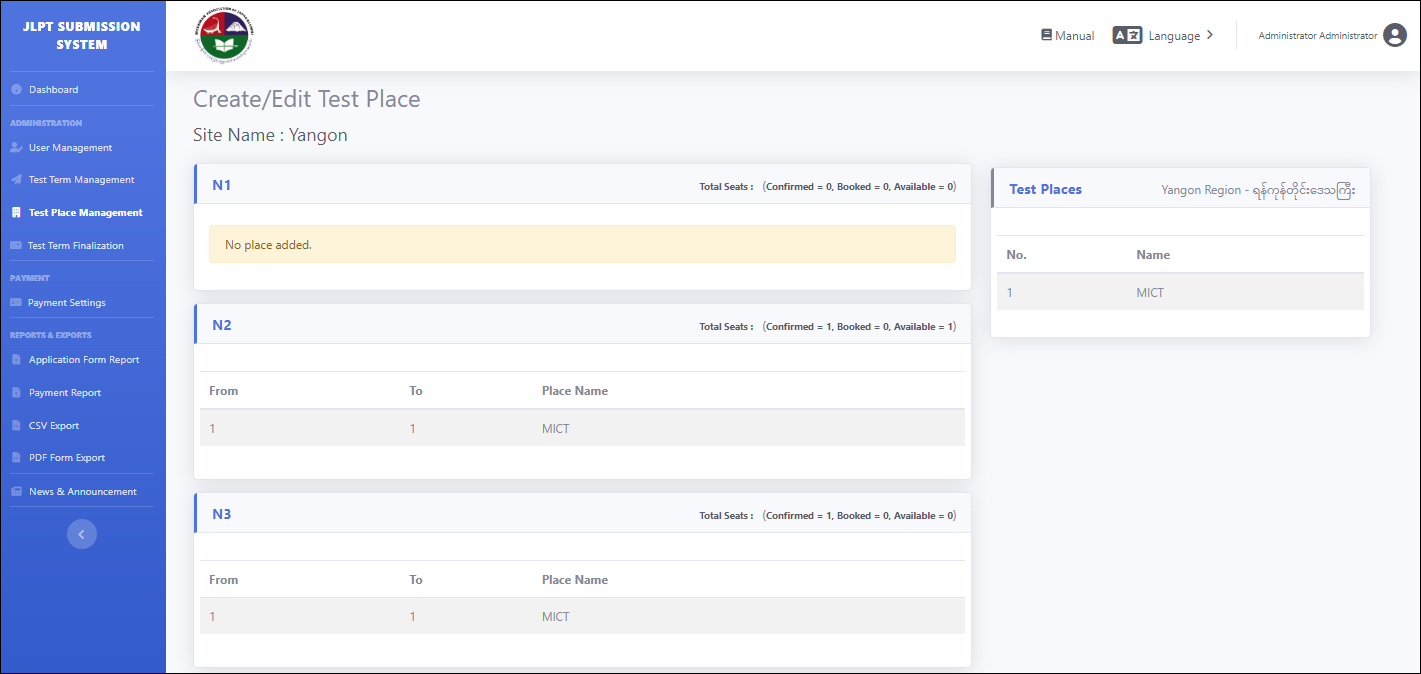
In this screen, the system show the list of all test sites defined in "Test Term Management". By clicking “View/Edit” button for each test site, “Create/Edit Test Place” screen will be displayed and user could view or edit the test place and allocate confirmed seats at test place.
User also can click “Back” button to go back to “Test Place Management” main screen.
1.3.1.2 Create/Edit Test Place
At this page, user can check all test place information including seat allocation of each JLPT test level here for test site selected from the "Test Site List" screen.
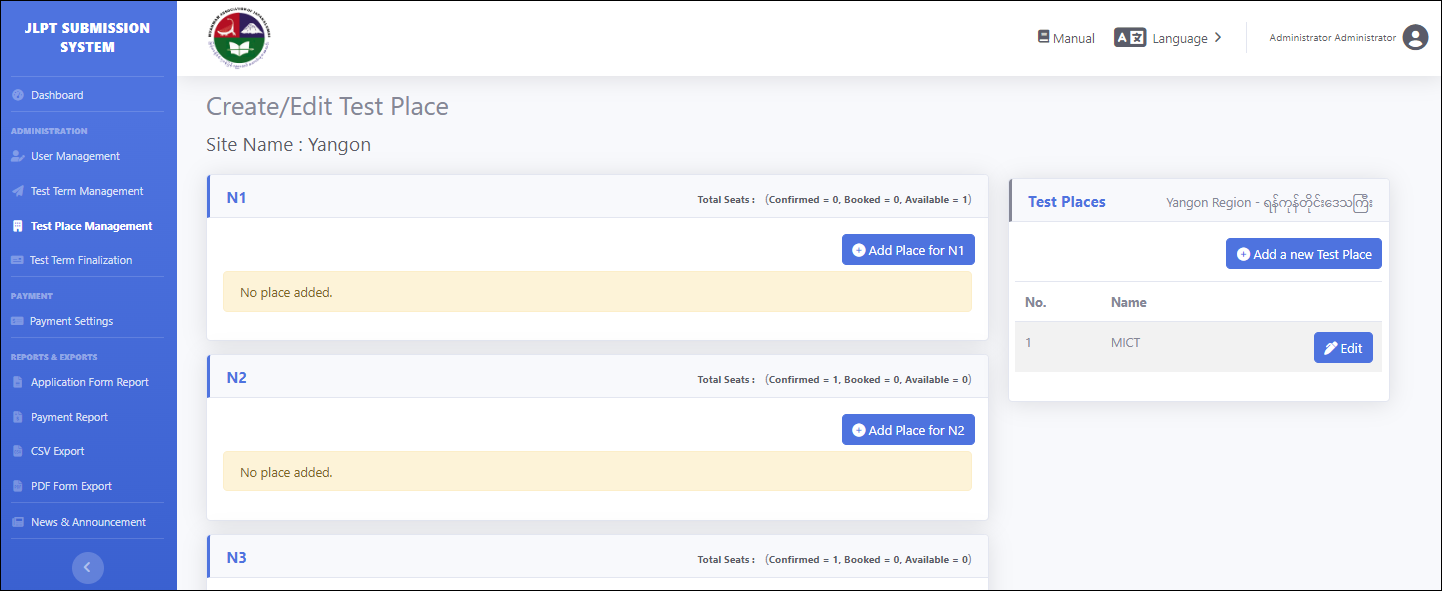
For creating the new test place can click "Add a new Test Place" button. After that, "Create/Edit Test Place" pop-up form will be displayed.
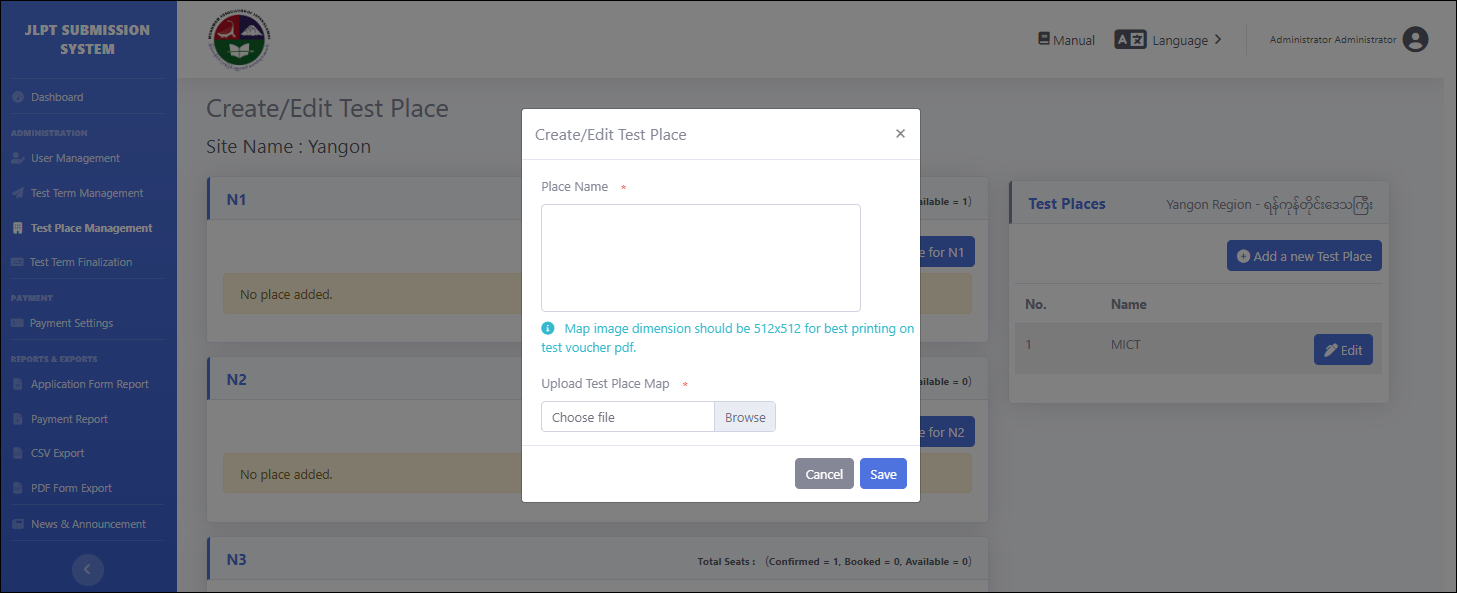
In this pop-up form, user need to fill the test place name and upload the test place map and then click "Save" button to keep test place information in the system. Click "Cancel" button to go back to "Create/Edit Test Place" screen without saving it.
User could modify the existing test places by clicking "Edit" button for each. In "Create/Edit Test Place" pop-up screen, user can amend the test place information and click "Save" button to update it. "Cancel" button is to go back without saving. Label name with red star are mandatory/required fields. User must fill data for those fields.
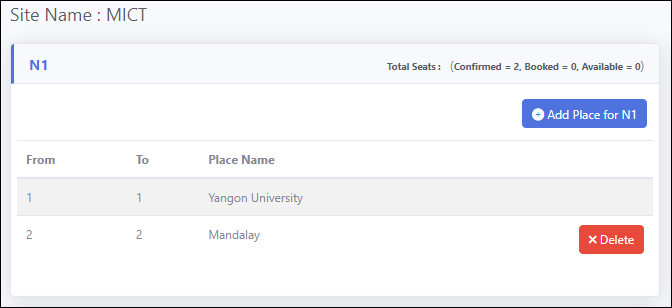
After creating the test place, user can allocate seat for JLPT test level to the test places. For each JLPT test level, total seats information(Confirmed, Booking, Available) will be shown and according to that information, user can arrange for the seats in the test place.
Note: User should allocate only for confirmed seats©. If user allocate for total seats (including booked(B) and available(A) seats), the system will save those data with warning message.
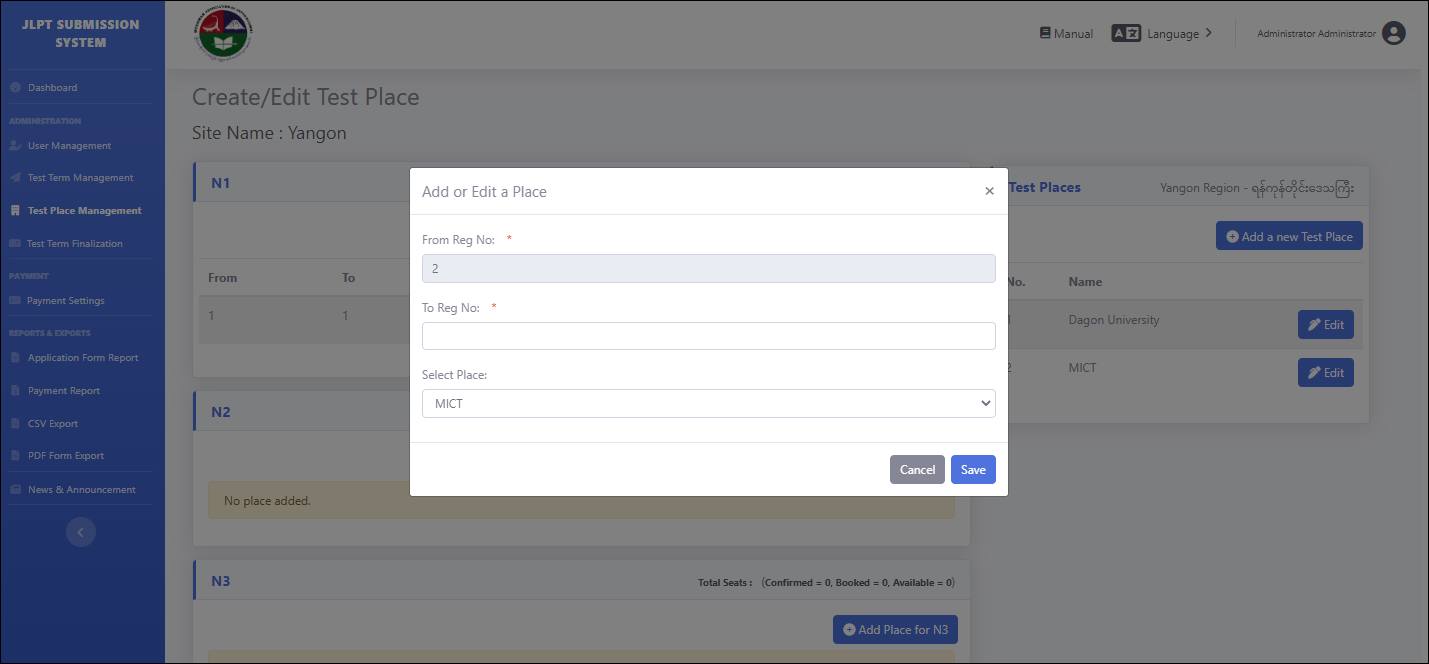
For example, To allocate the seat to the test place for JLPT test level N1, user click "Add Place for N1" button and then "Add or Edit a Place" pop-up form will be appeared. If it is the first time for that level, “From Reg No:” will be started with “1”, and it is uneditable. User fill “To Reg No:”, choose the test place and then click "Save" button. User may click "Cancel" button to go back without saving allocation. Label name with red star are mandatory/required fields. User must fill data for those fields.
Note: User cannot choose test place which already allocated by seats.
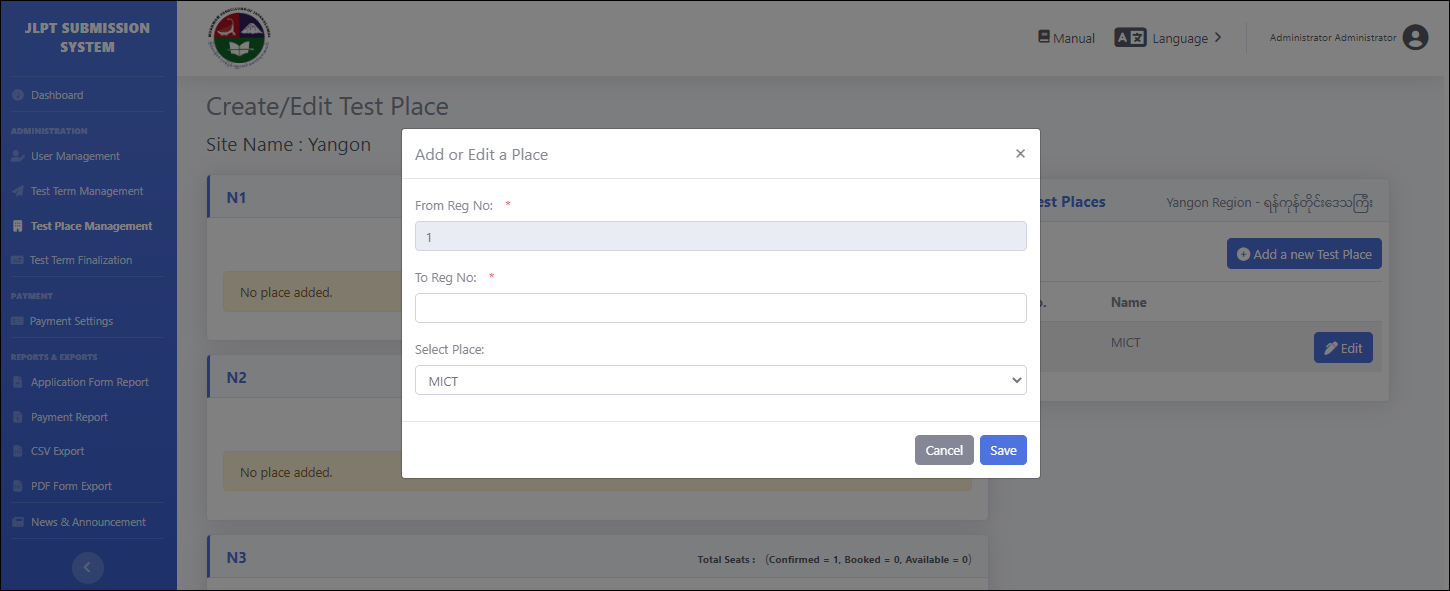
If it is not first allocation for N1, “From Reg No:” will be continuous number of "To Reg No:" from previous allocation and cannot modify that field.
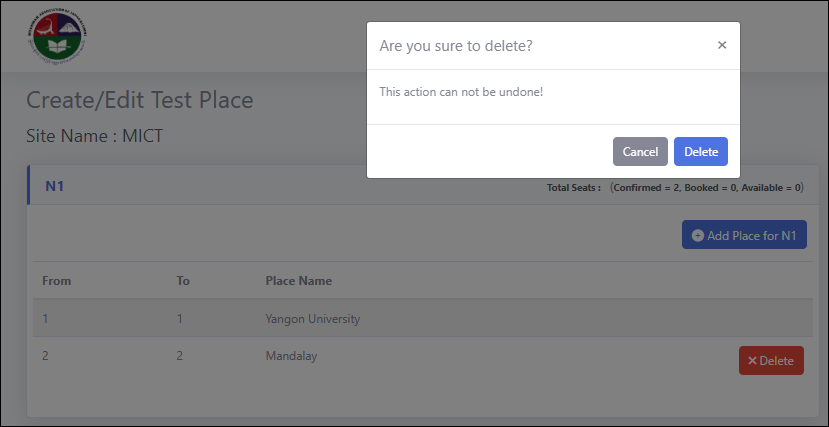
User can delete the seat allocation using “Delete” button.
Note: The system does not allow to modify allocation seat. If user want to modify allocation seat, user need to delete exist test place firstly.
Clicking "Delete" button, confirmation pop-up form "Are you sure to Delete?" will be displayed. Click "Delete" button to confirm deletion, or click "Cancel" button to go back without deleting.
1.3.2 Previous Test Terms
If exam date is over, upcoming test term change to previous test term. For previous Test Term, User can only view the test place information for the previous test term and could not edit it. If there is no previous test term, “No previous test term found” information will be displayed.
When click "View" button, "Create/Edit Test Place" page will be displayed and user can confirm the data.
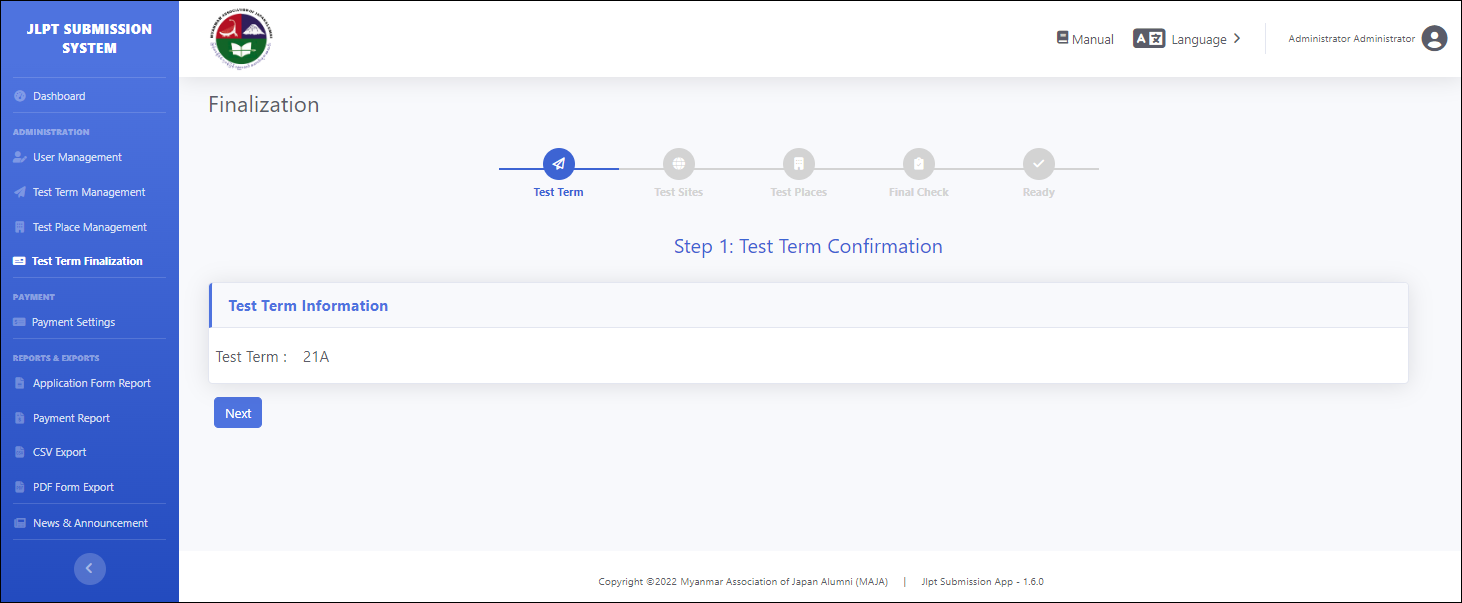
1.4 Test Term Finalization
Test Term finalization process check and confirm all information such as test term, test site, test place and seat allocation to be ready for the exam. And this function will do processing for the exam and preparing examinee register number, application forms, test vouchers for sending to the applicants and also generate csv form.
Test term finalization process will be done in five steps.
Step 1: Display test term information and user can confirm those information.
Step 2: Display test site and seat information. User can confirm those information.
Step 3: Display test place and confirmed seats(C) allocation information. User can confirm those information.
Step 4: System will check test term info, test site and seat info, confirmed seats allocation done by correctly.
Step 5: System will generate required information and document for the exam.
1.4.1 Test Term Confirmation
This is the first step of Test Term Finalization. User can confirm correct test term name.
User can click “Next” button to go next step after confirming test term name.
1.4.2 Test Sites and Seats Confirmation
"Test Site Information" screen will be displayed when user click "Next" of "Test Term Information" screen.
In "Test Site Information" screen, user can check and make sure total number of seat for each test level in each test site.
Note: To finalize test term, the total number of seats of each test level in each test site must be confirmed©. Booked seats(B) and available seats(A) must be 0.
By clicking “Next” button, finalization will continue to next step. And also, can go back to previous finalization step by click “Previous” button.

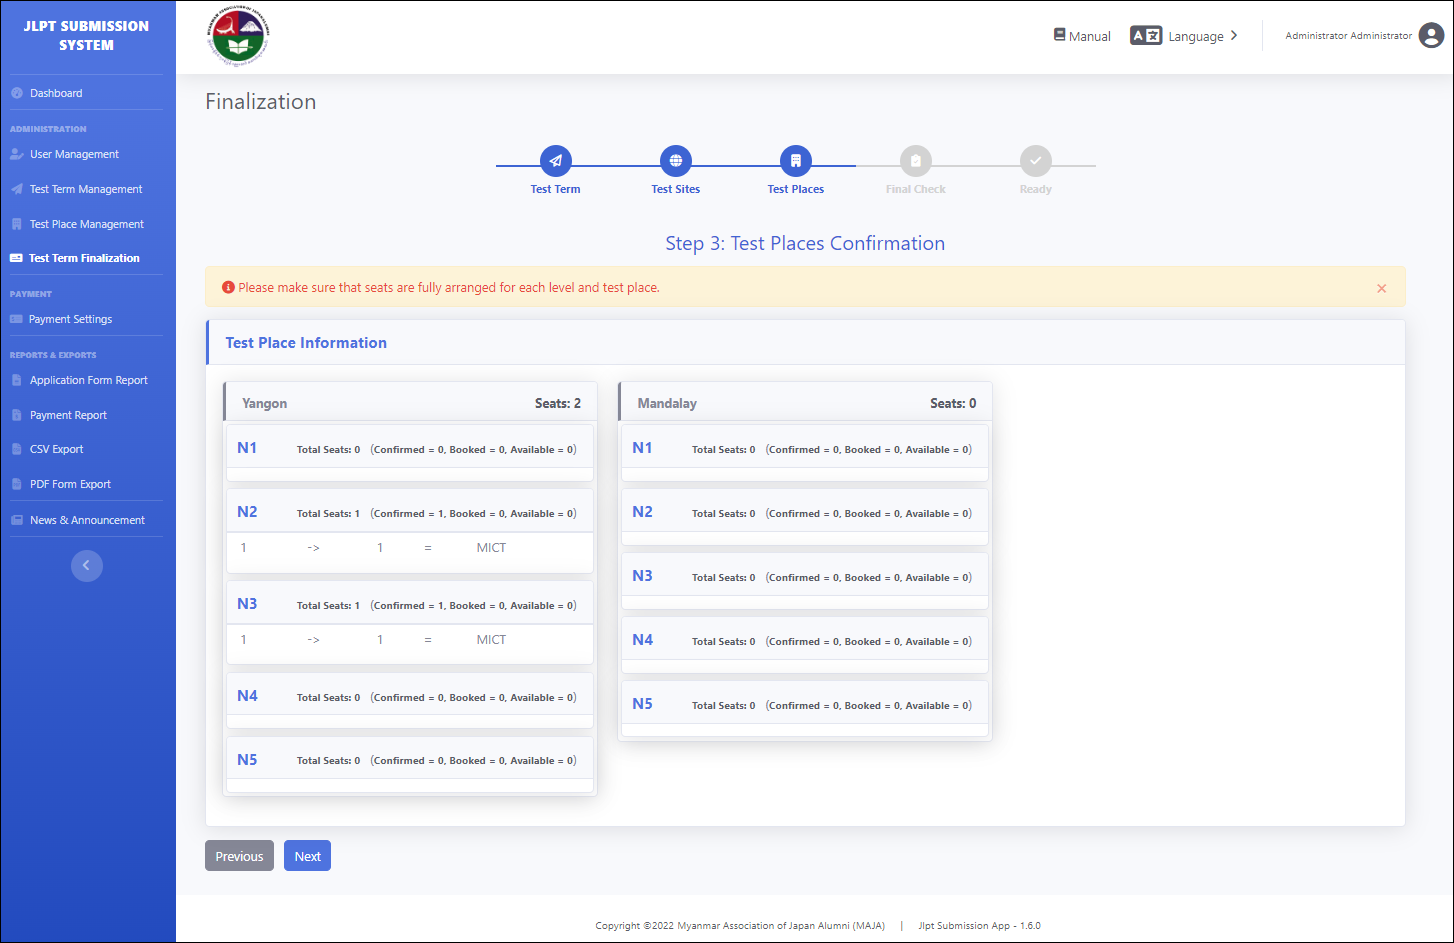
1.4.3 Test Places Confirmation
In this step, user can check all confirmed seats of each test level must be allocated in test place correctly for each test site.
Click “Next” button to go next step or go back to previous step by clicking “Previous” button.
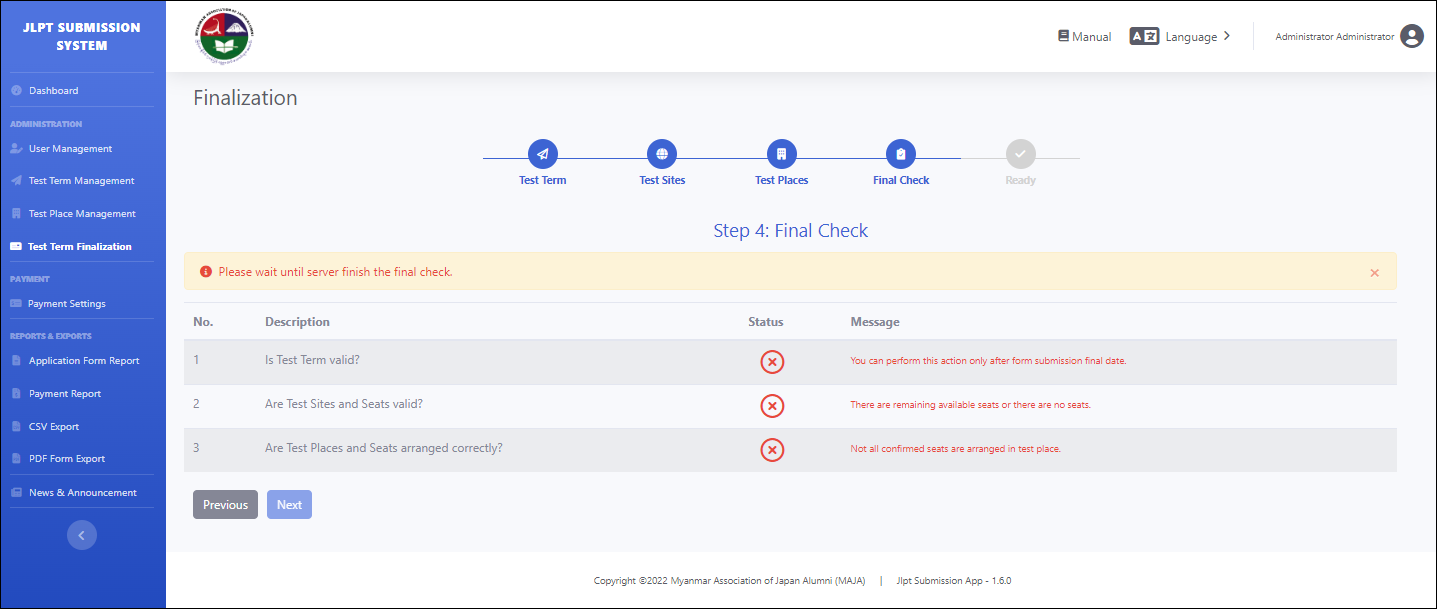
1.4.4 Final Check
User can perform this process only after form submission final date. At the Final Check screen, user may wait a while for checking the following three steps.
-
Is Test Term valid?
-
System check test term information is correct or not. If final submission date is greater than or equal with today date, "You can perform this action only after form submission final date." message will be displayed.
-
-
Are Test Sites and Seats valid?
-
System check each test site information and all seats of each test level are confirmed ©. If there are available seats(A) and book seats(B), "There are remaining available seats or there are no seats." message will be displayed.
-
-
Are Test Places and Seats arranged correctly?
-
System check all confirmed seat© are allocated correctly in each test place of each test site. If all confirmed seat are not allocated correctly, "Not all confirmed seats are arranged in test place." message will be displayed.
-
When all checking are finished successfully, green check mark icon will be displayed at the "Status" column. Otherwise, red check mark icon will be displayed at the "Status"column and relevant error message will be displayed at the "Message" column.
Final Check (Successfully status)
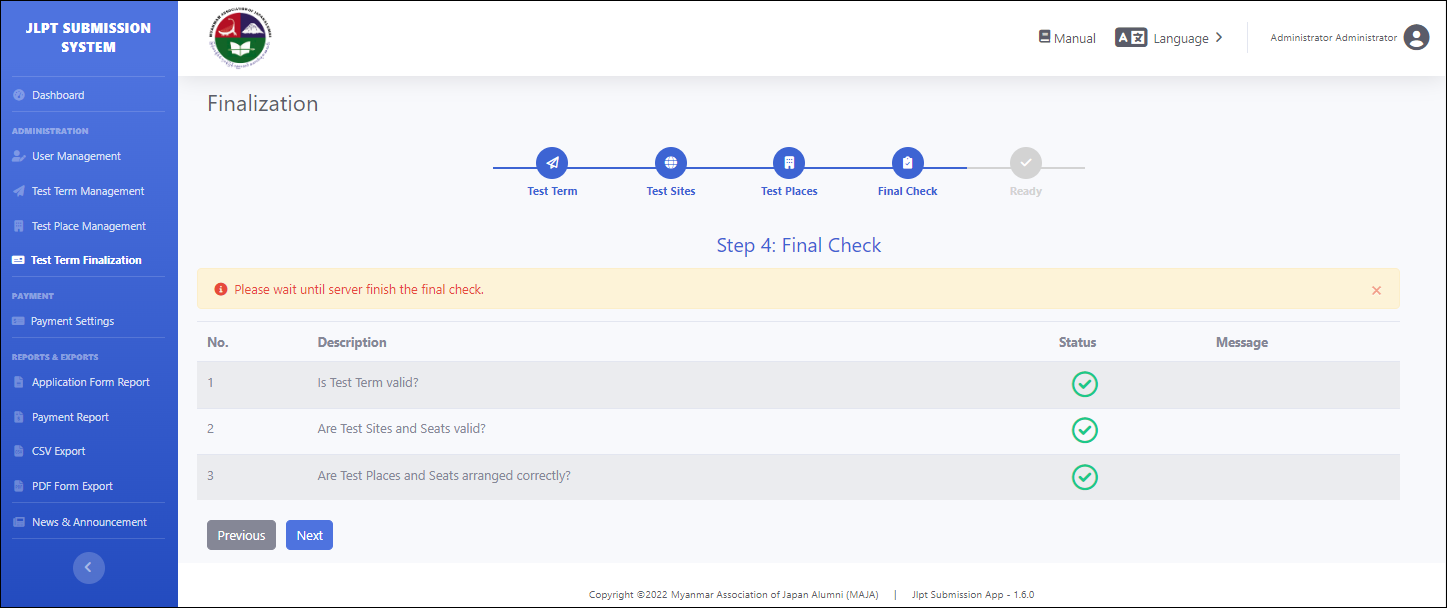
If there is error in final checking state, "Next" button is disable and cannot continue finalization process. Otherwise, user can click "Next" button and can go to next process. User also can go back to previous step by clicking "previous" button.
Final Check (Error status)
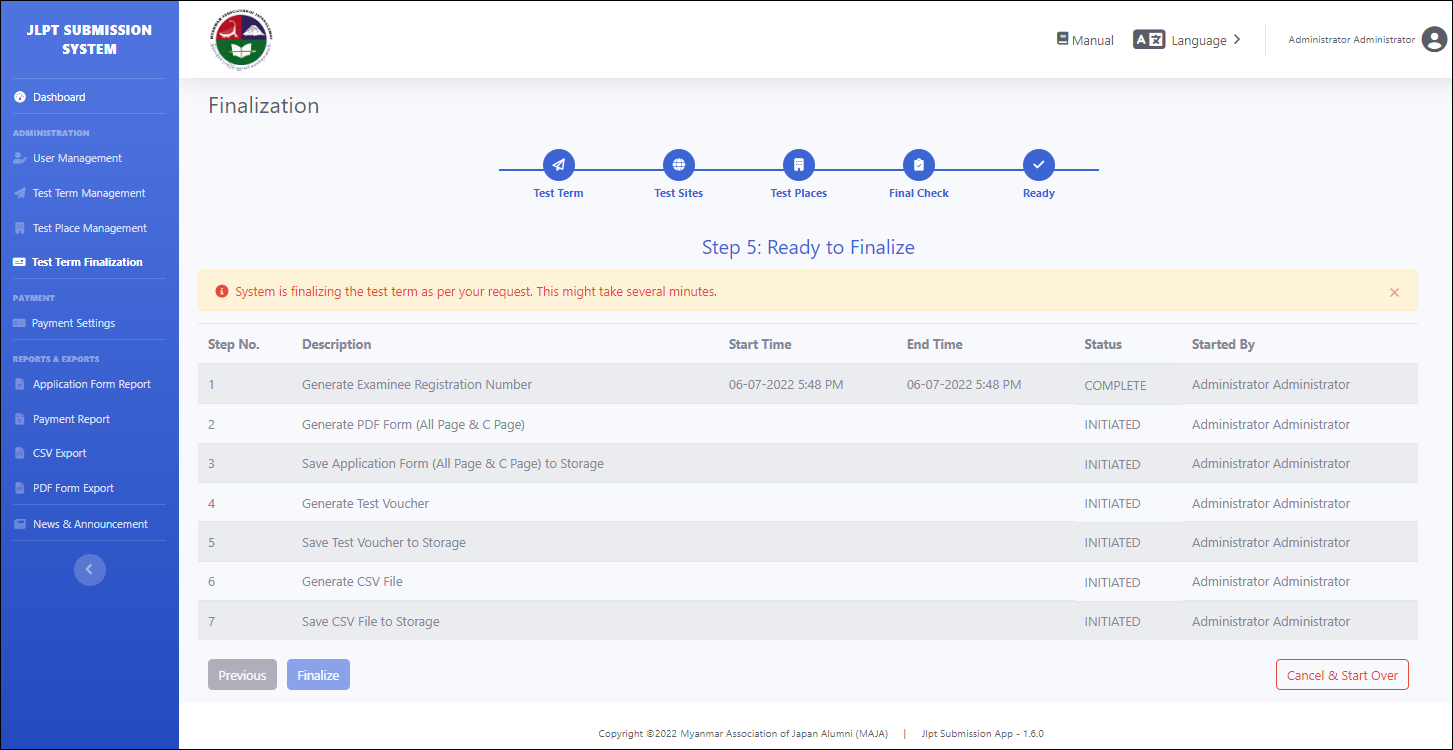
1.4.5 Ready
After final check processes is finished successfully, user can finalize the test term by clicking "Finalize" button or may go back to the previous state by clicking "Previous" button.
Once user click “Finalize” button, the system will do the following tasks.
(1) Generate Examinee Registration Number : generate "Examinee Registration No" of each application for all applicants. User can confirm registration number at the "Application Form Report" screen.
(2) Generate PDF Form (All Page & C Page) : generate application forms in PDF format for each application.
(3) Save Application Form (All Page & C Page) to Storage : save generated application forms at server. User can download them from "Application Form Report" menu or "PDF Form Export" menu screen. Applicants can download their application form in PDF from "Get Test Voucher" screen.
(4) Generate Test Voucher : generate test voucher for each applicant.
(5) Save Test Voucher to Storage : save test voucher at server and then user can download test vouchers in PDF format at "Application Form Report" and "PDF Form Export" screen. Applicants can download their test voucher in PDF format at "Get Test Voucher" screen.
(6) Generate CSV file : generate application forms as CSV format for every applicant.
(7) Save CSV file to Storage : save generated CSV files at server, and then user can download them at "CSV Export" screen.
If user want to cancel the whole finalized process, click "Cancel & Start Over" button.
Note: User needs to be sure that not to click “Cancel & Start Over” button during finalization process(Step 5).
After finalization is finished successfully, all finalization steps must be "COMPLETE" at the Status column. Otherwise, it must be "ERROR". User can check correct seat allocation for test sites and test places, test vouchers, generated CSV files, generated application forms, saved csv file stored in server.
2. Payments Management
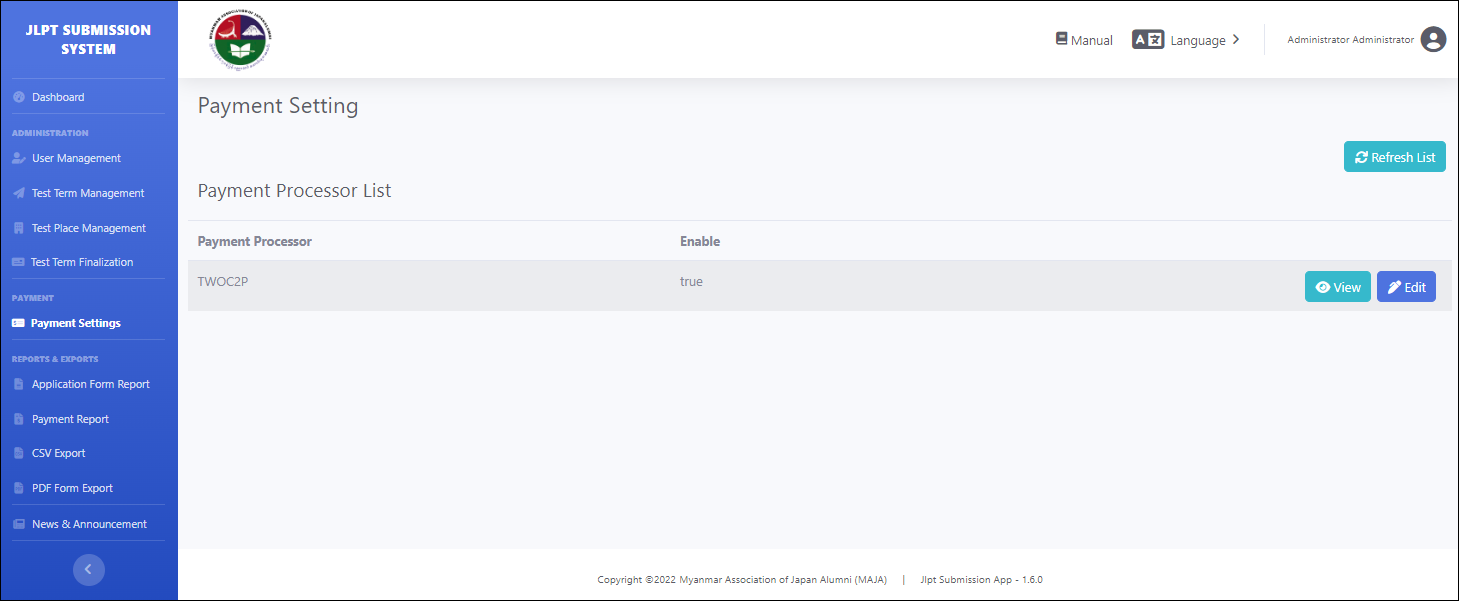
2.1 Payment Settings
User need to setup payment configuration information in this screen. For the JLPT Application Form Apply system, payment will use 2C2P payment gateway. So, user need to setup 2C2P gateway information here. This screen is used for one time setup.
Note: If user use other payment party, user need to request gateway information and can setup here.
When click "Payment Settings" at the navigation menu, user can see "Payment Processor List" information at the "Payment Setting" screen.
User can view or edit the payment setting by clicking "View" button or "Edit" button.
Clicking “View” button, the system will display the payment setting information and user can go back by clicking "Back" button. If user want to modify those information, user can click "Edit" button.
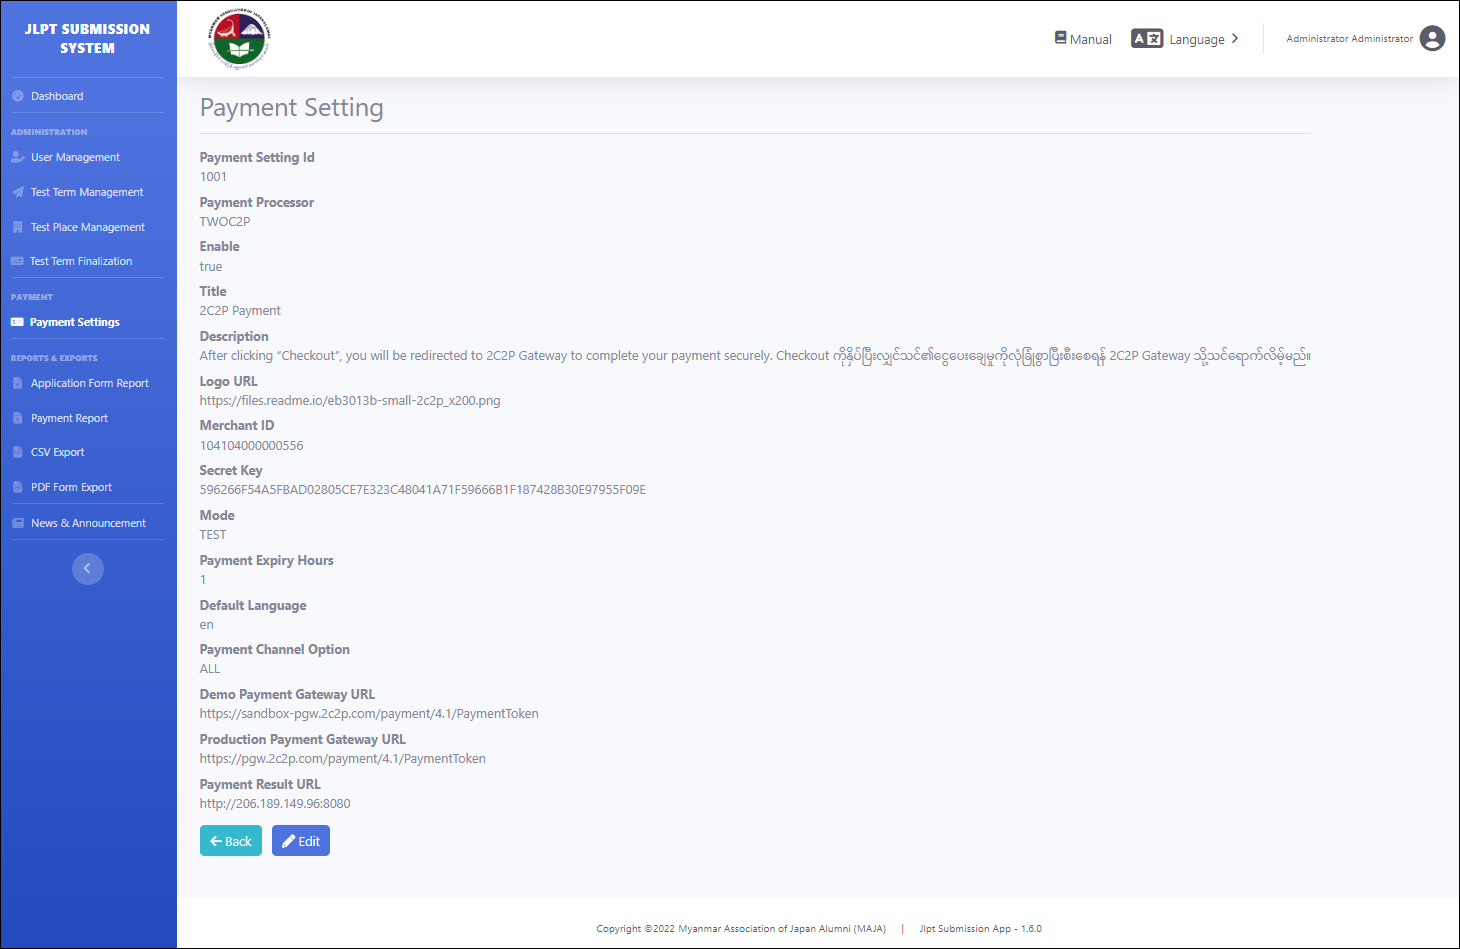
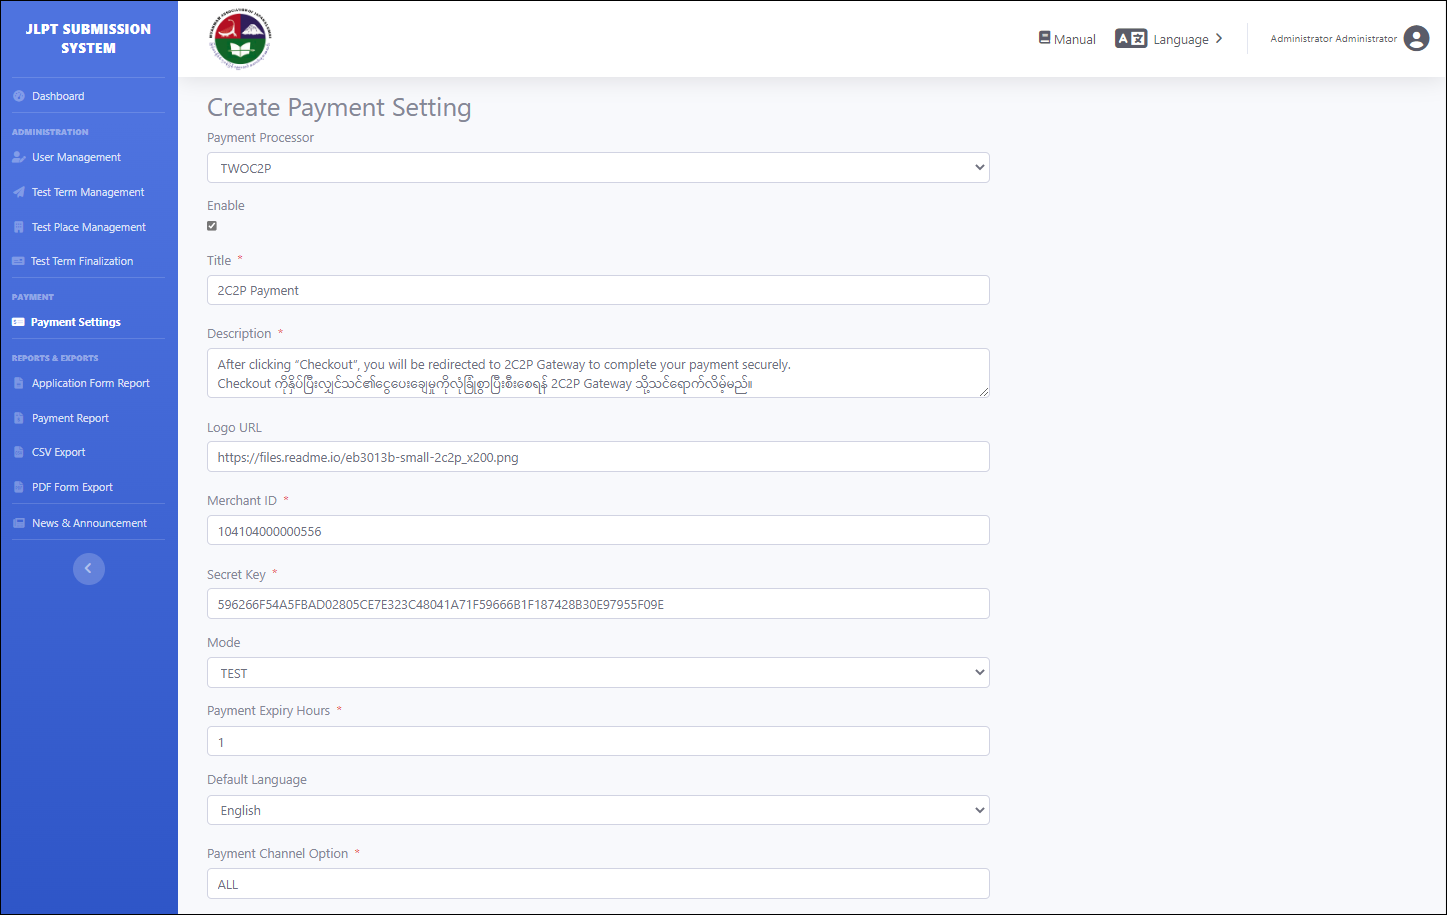
User need to fill the following payment information for payment setting. Label name with red star are mandatory/required fields. User must fill data for those fields.
(2.1.1) Payment Processor : User need to choose payment gateway. Currently, system use 2C2P gateway.
(2.1.2) Enable : User can check enable when user do not want to use payment for JLPT Application Form Apply system.
(2.1.3) Title : User need to give payment title.
(2.1.4) Description : User need fill payment description.
(2.1.5) Logo URL : User can provide logo of payment party.
(2.1.6) Merchant ID : User need to fill merchant ID that provided by payment party.
Note: Merchant ID can be changed based on development/production environment.
(2.1.7) Secret Key : User also need to fill secret key that provided by payment party.
Note: Secret Key which get from payment portal can be changed based on development/production environment.
(2.1.8) Mode : User also can choose "TEST" mode for development environment or "LIVE" mode for production environment.
(2.1.9) Payment Expiry Hours : User need to input expiry hours to define waiting time of Over The Counter payment type.
(2.1.10) Default Language : User can choose language.
(2.1.11) Payment Channel Option : User need to fill which payment channel will be used for exam fee. Currently, system fill "ALL" for the following payment type :
- Cards Payment : MPU
- Digital Payment : OK Dollar, CBPay QR, KBZPay QR
- 123 Service : Over the counter, Internet/Mobile Banking, Web Pay/Direct Debit
(2.1.12) Demo Payment Gateway URL : User need to fill demo gateway URL which provided by payment party.
(2.1.13) Production Payment Gateway URL : User need to fill production gateway URL which provided by payment party.
(2.1.14) Payment Result URL : User need to fill ip/domain of the system.
After filled the above fields, user can click "Save" button to save data or user can also click "Cancel" button to cancel the data.
3. Reporting
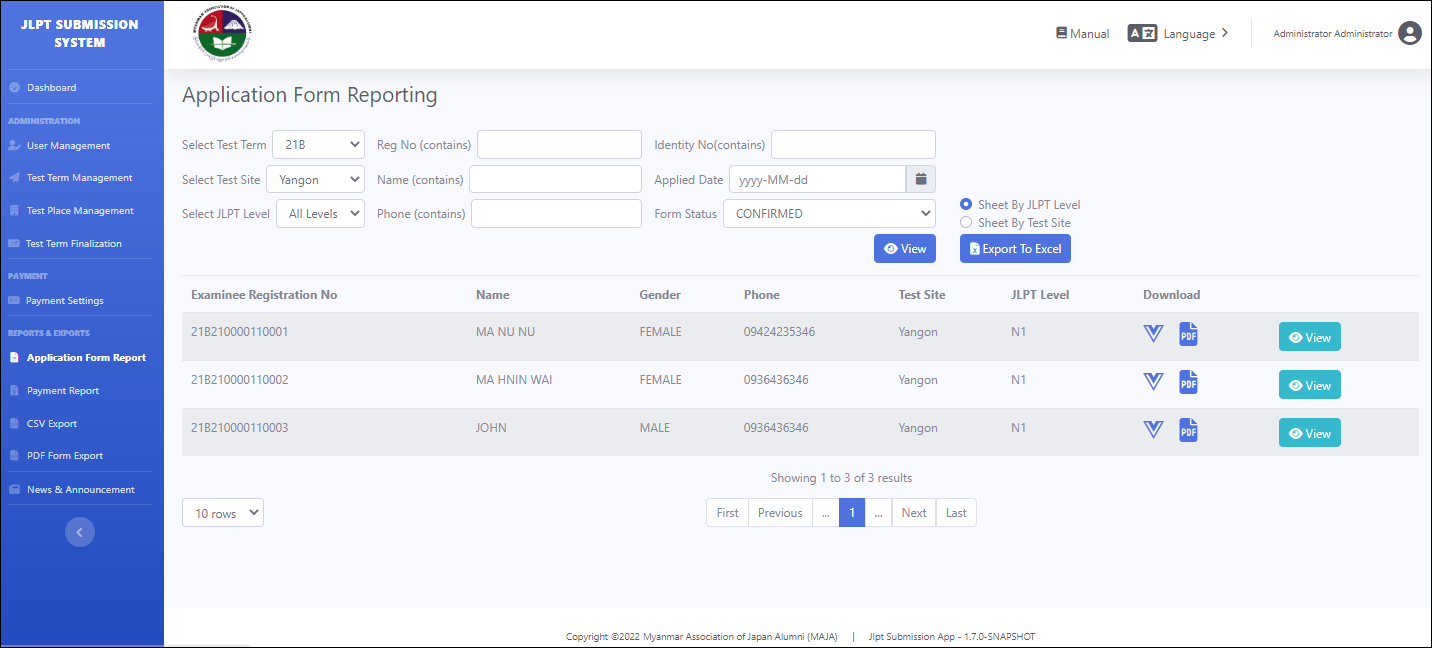
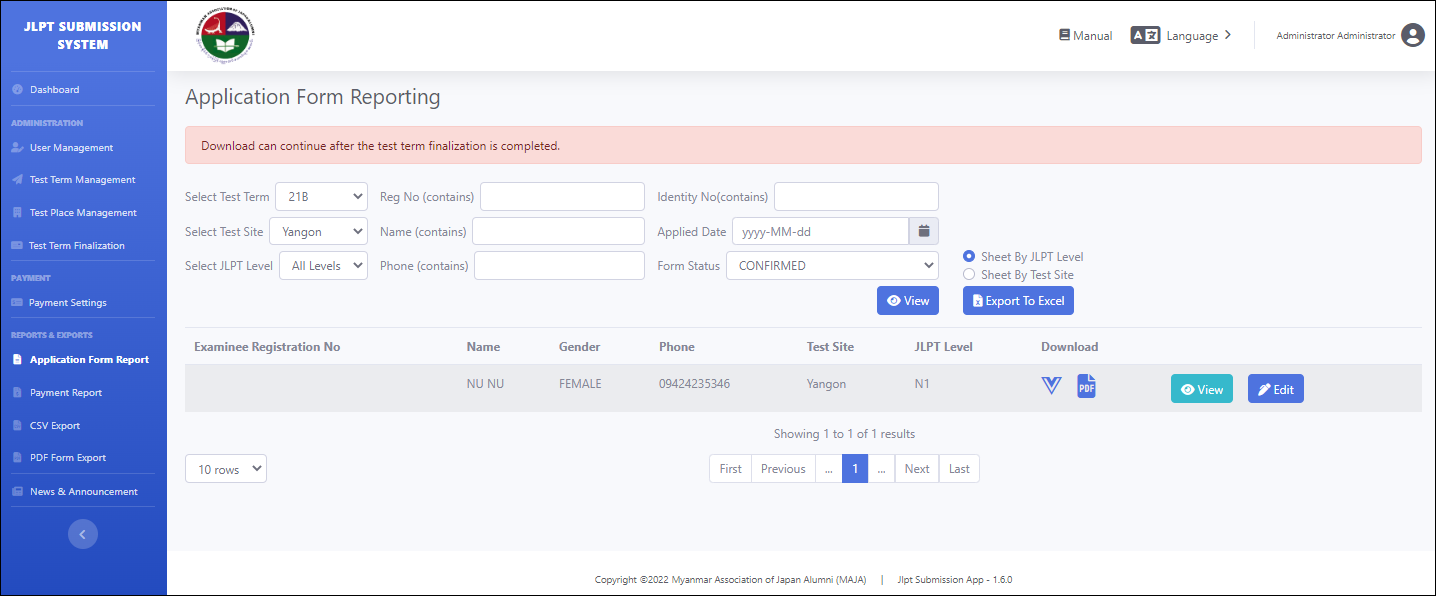
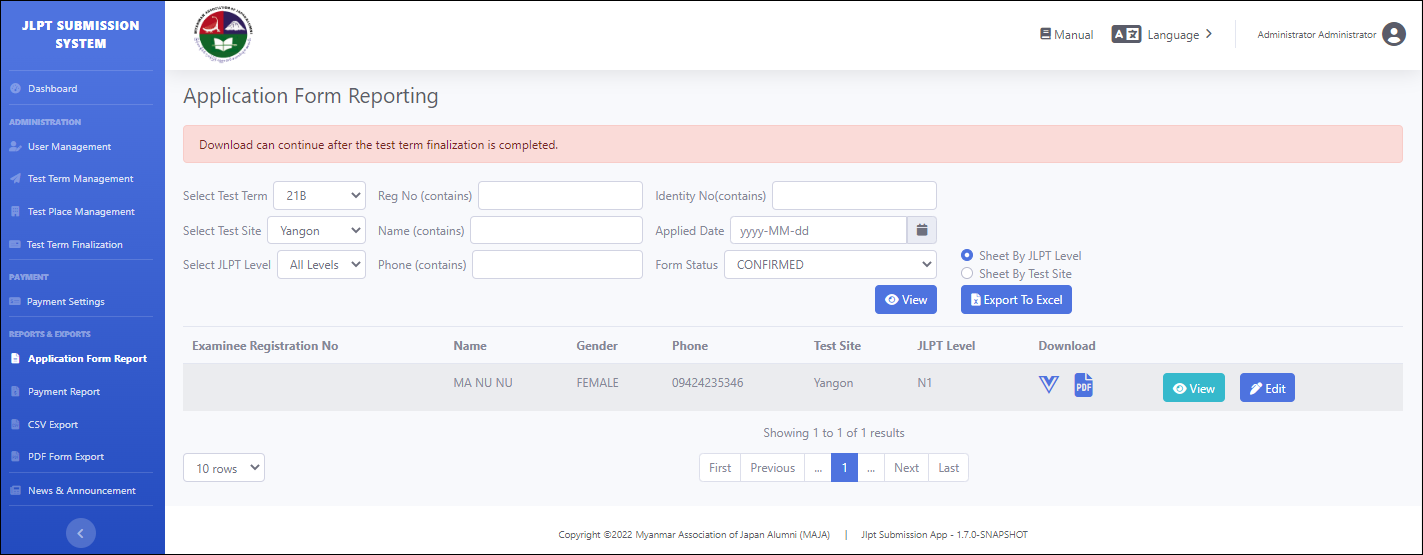
3.1 Application Form Report
In this screen, user can see the application form reports and test voucher reports for each applicant.
3.1.1 Search Application Form Report
Administrator can search the reports by test term, tset site, reg no, name, phone number, identity no, applied date and form status. Moreover, user can generate the report in two options.
Option 1 : Sheet By JLPT Level
Option 2 : Sheet By Test Site
Administrator can choose the reports number of rows per page from row dropdown list(10 rows, 20 rows and 50 rows).
Note: Before test term finalization, does not display Examinee Registration No.
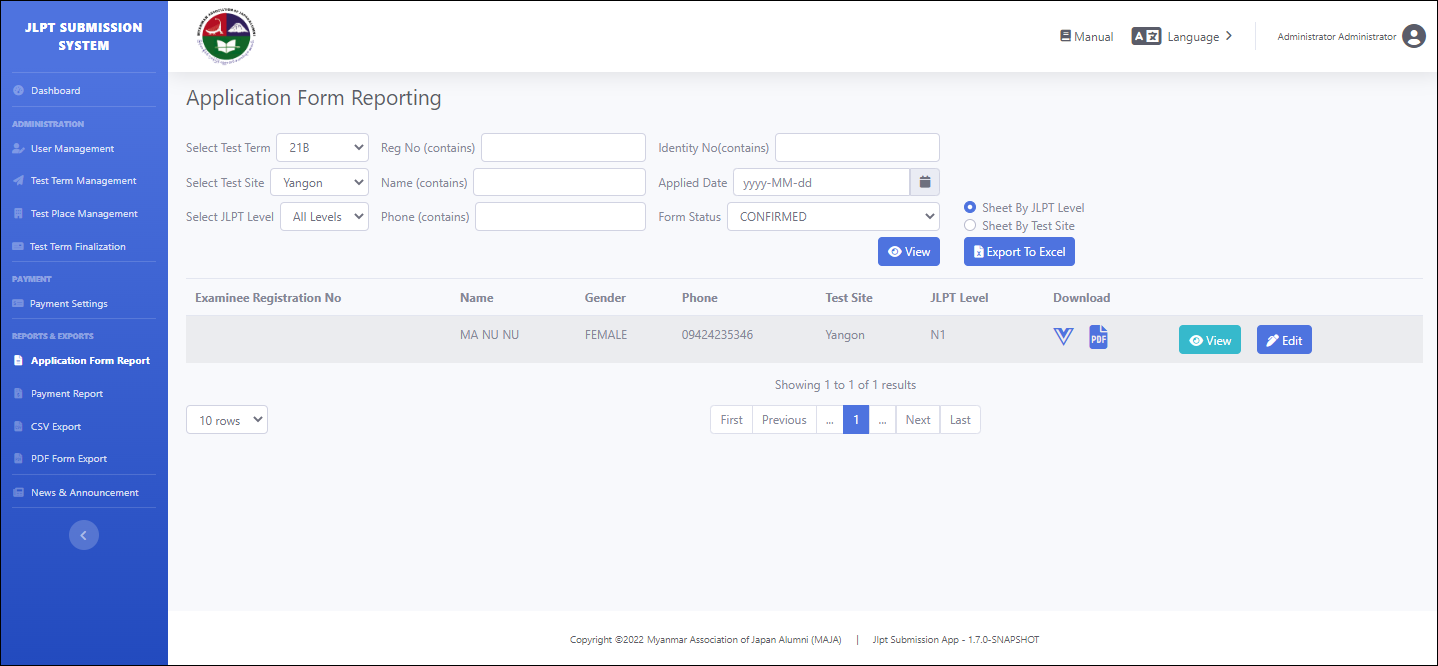
Note: After test term finalization, display Examinee Registration No.
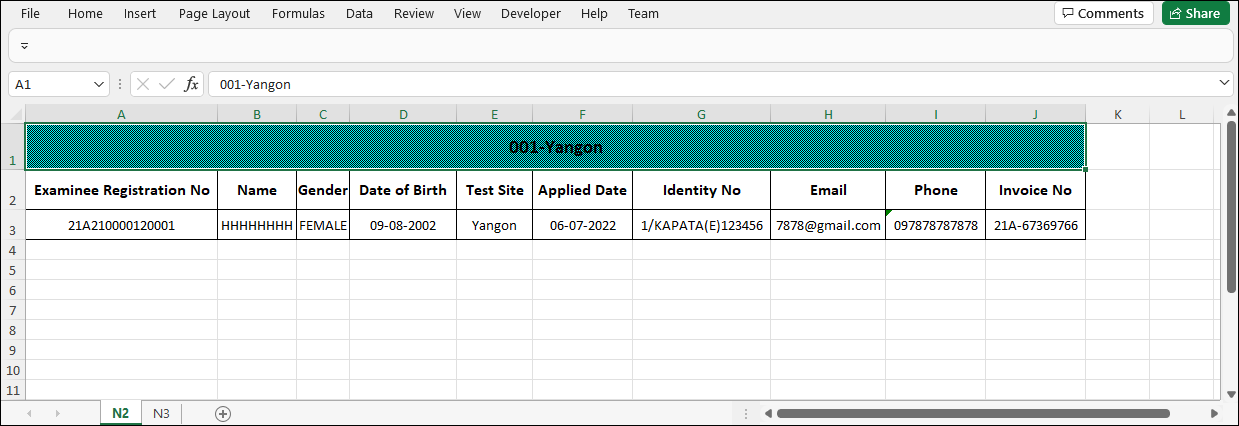
3.1.2 To export Excel 'Sheet By JLPT Level'
After clicking “Export To Excel", "Export option" pop-up page will be displayed.
User can customize the header of the report by dragging and dropping the columns.
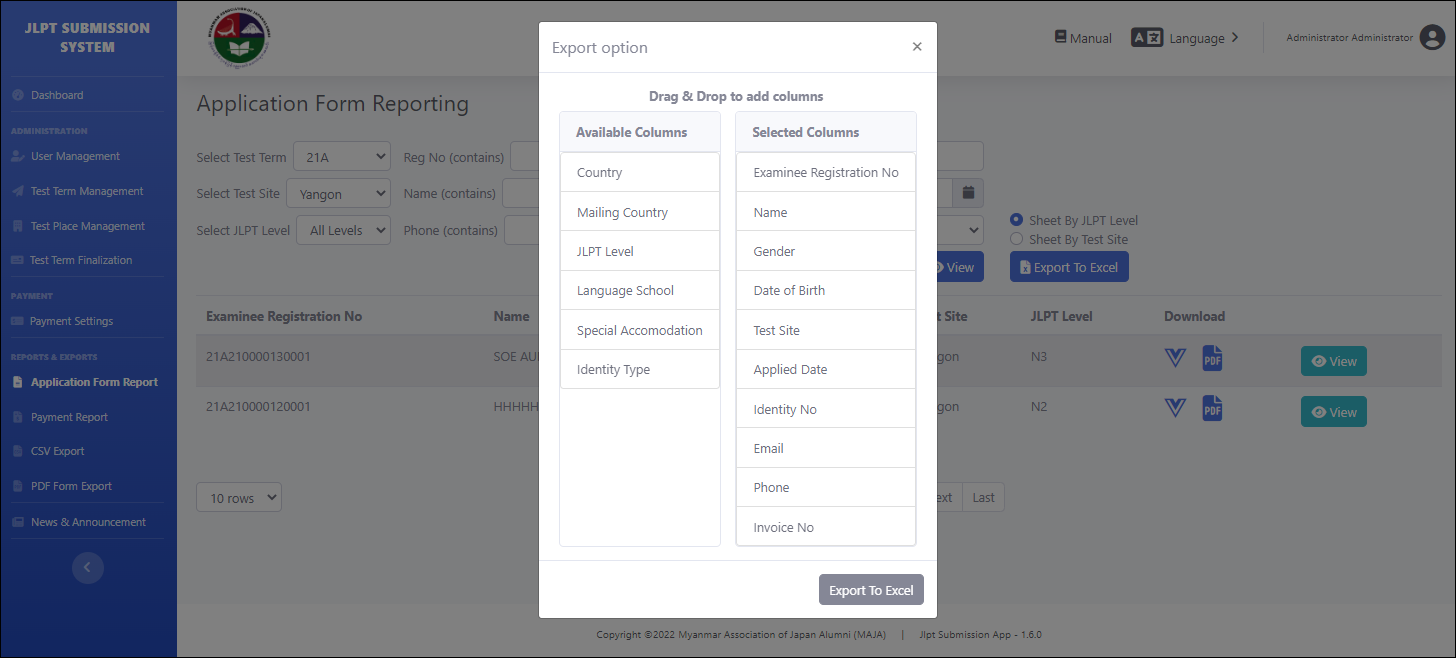
After clicking "Export To Excel" button, the data will be downloaded automatically and user can confirm downloaded data.
Note: If user choose "Sheet By JLPT Level", excel report sheet will be generated based on JLPT level.
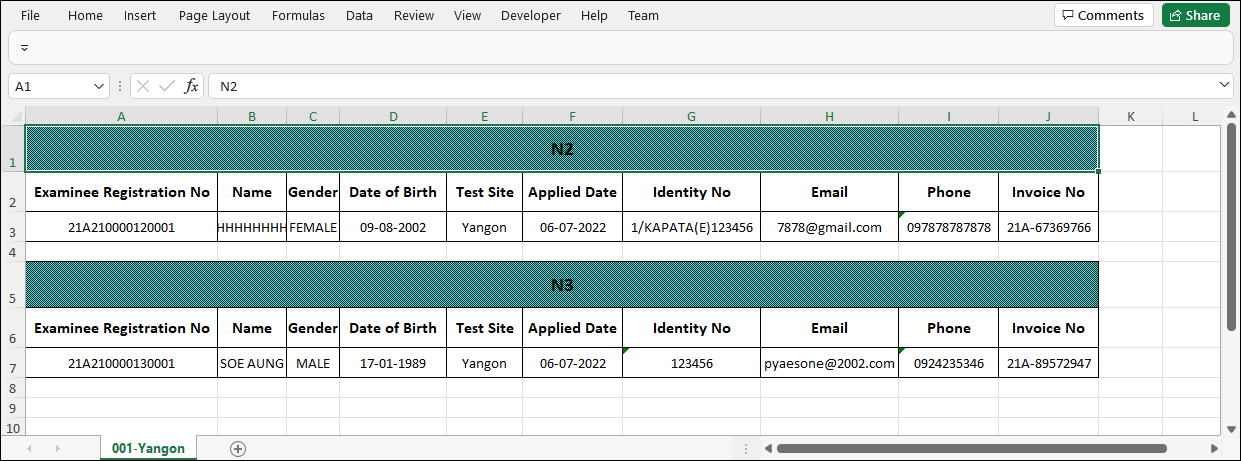
3.1.3 To export Excel 'Sheet By Test Site'
After clicking “Export To Excel" button, Export Option pop-up page will be displayed.
User can customize the header of the reoprt by dragging and dropping the columns.
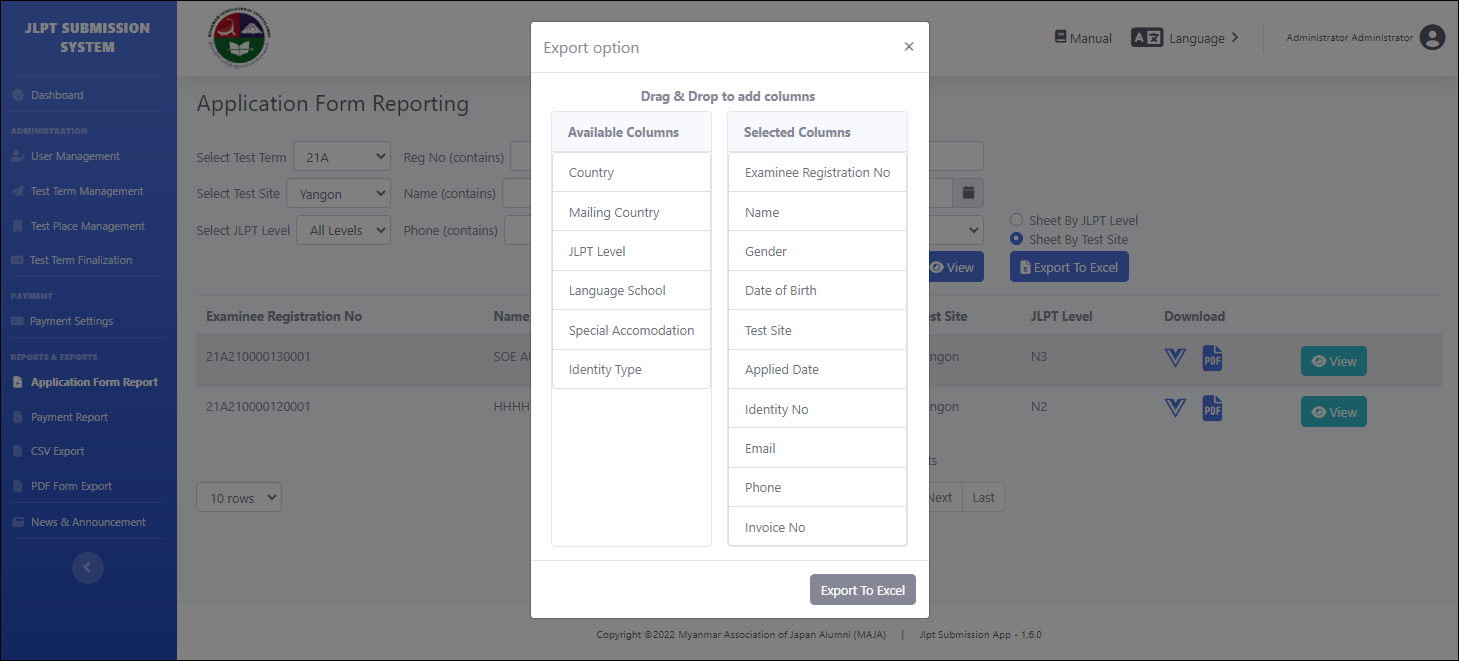
After clicking the ‘Export To Excel’ button, the data will be downloaded automatically. can open and confirm downloaded data.
Note: If user choose "Sheet By Test site", excel report will be generated based on test site.
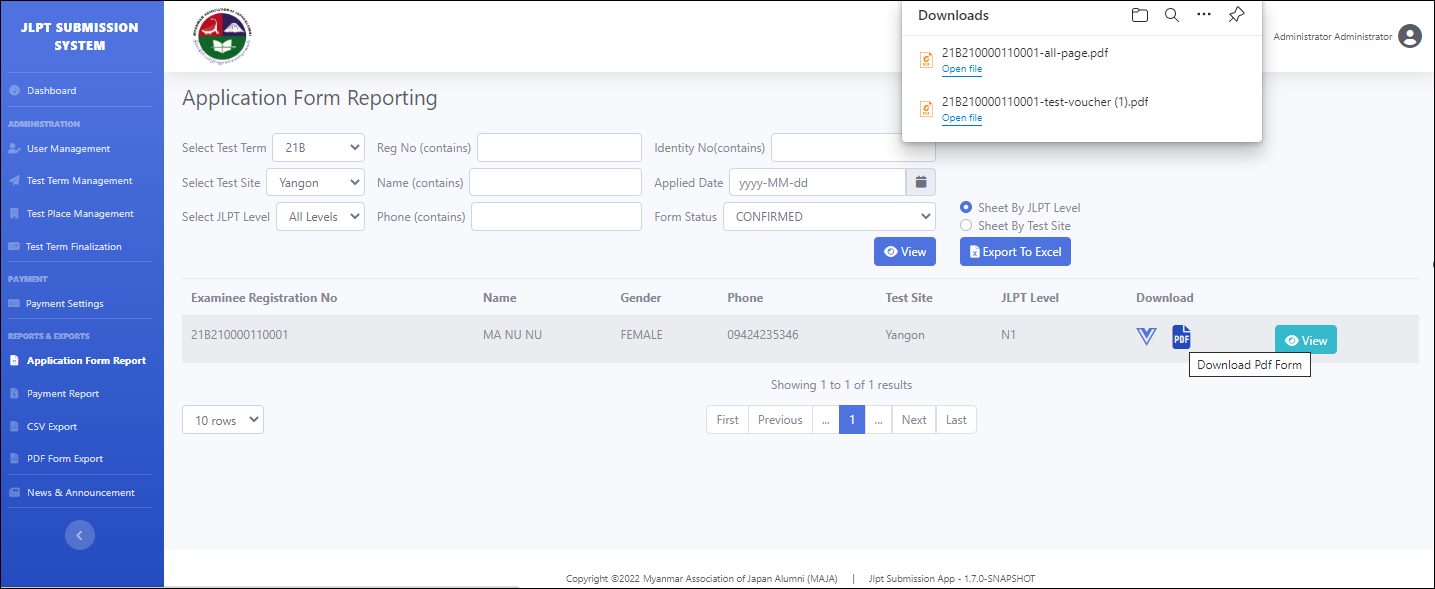
3.1.4 Download Test Voucher
Before test term finalization, by clicking "Download Test Voucher" image button, “Download can continue after the test term finalization is completed.” message will be displayed.
After test term finalization, by clicking "Download Test Voucher" button, the data file will download automatically. User can open and confirm downloaded data.
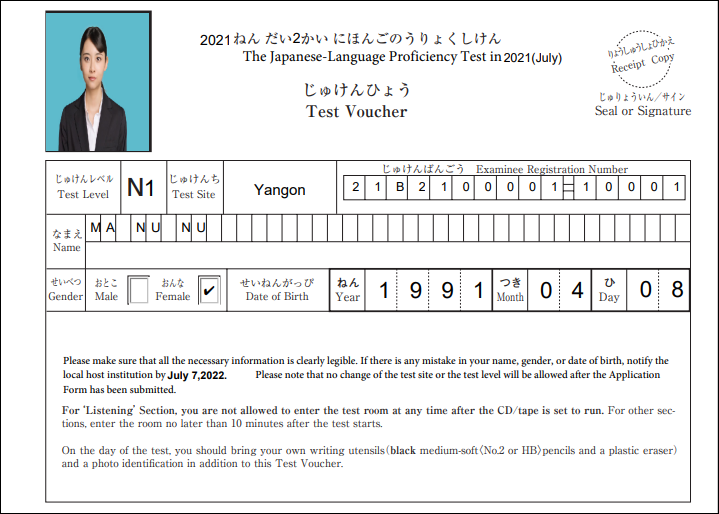
Note: Test place map will be included in the test voucher.
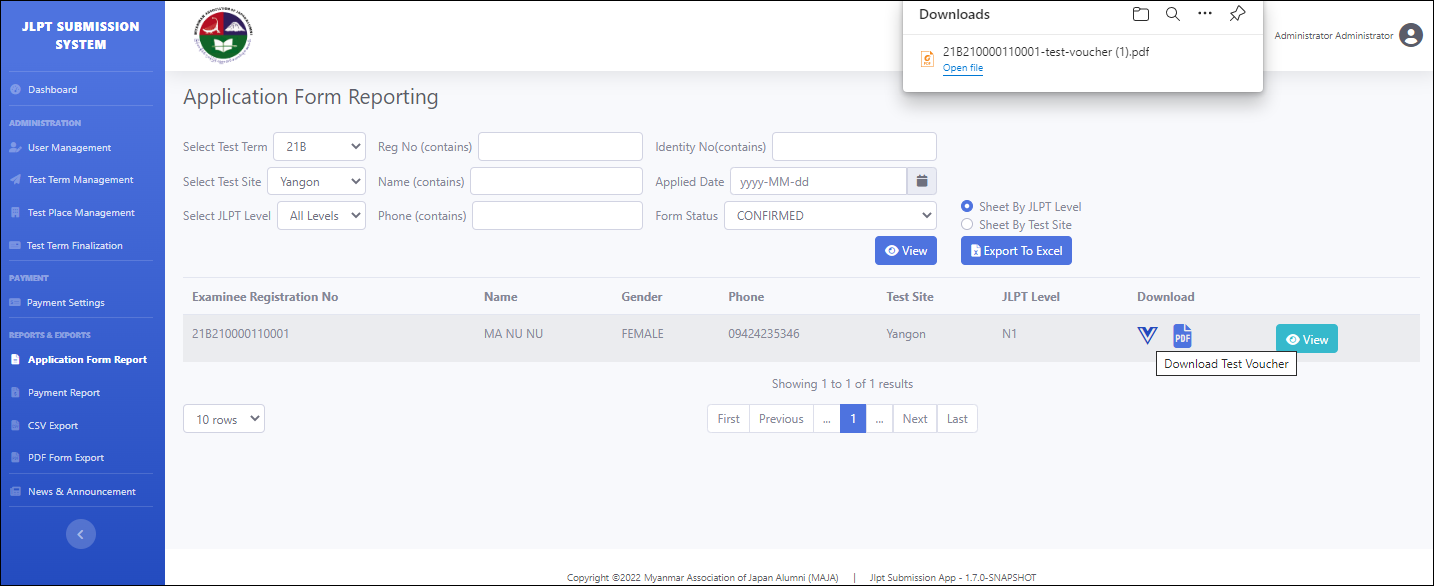
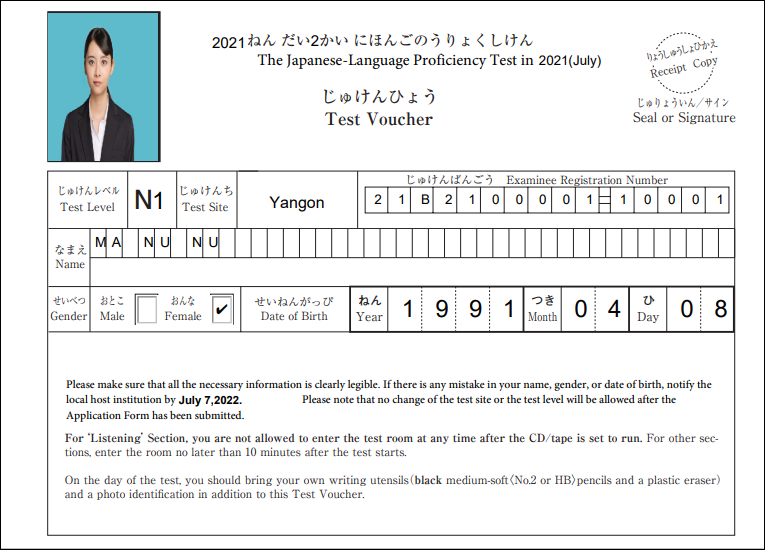
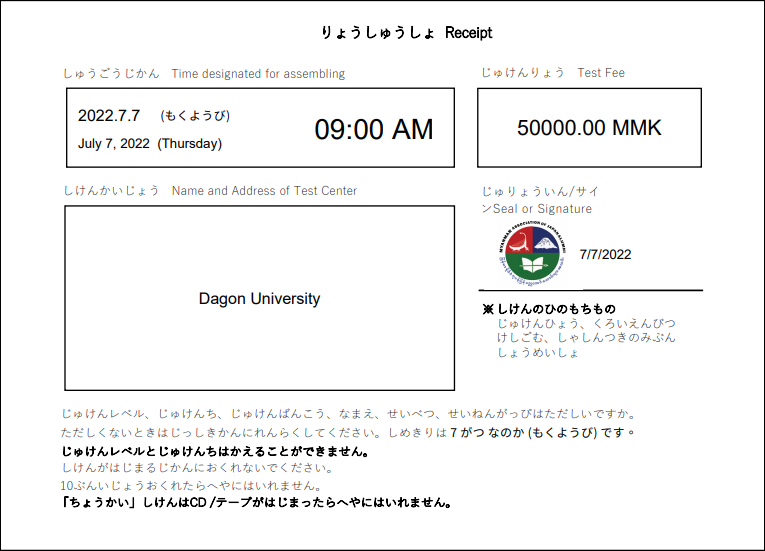
At the test voucher file, there are four (4) pages.
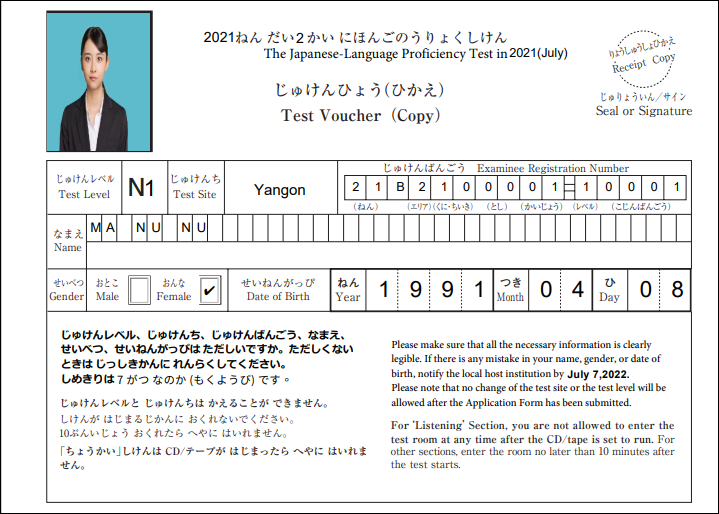
First Page : Test Voucher
Second Page : Receipt
Third Page : Exam Rule
Fourth Page : Test Place Map
3.1.5 Download PDF Form
Before test term finalization, by clicking "Download Pdf Form" image button, “Download can continue after the test term finalization is completed.” message must be displayed.
After test term finalization, by clicking "Download Pdf Form" image button, the data file will be downloaded automatically. User can open and confirm downloaded file.
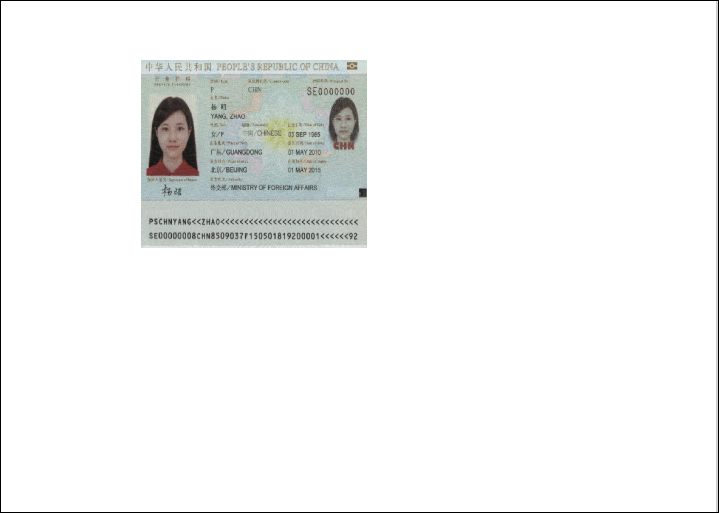
At the test voucher file, there are six (6) pages.
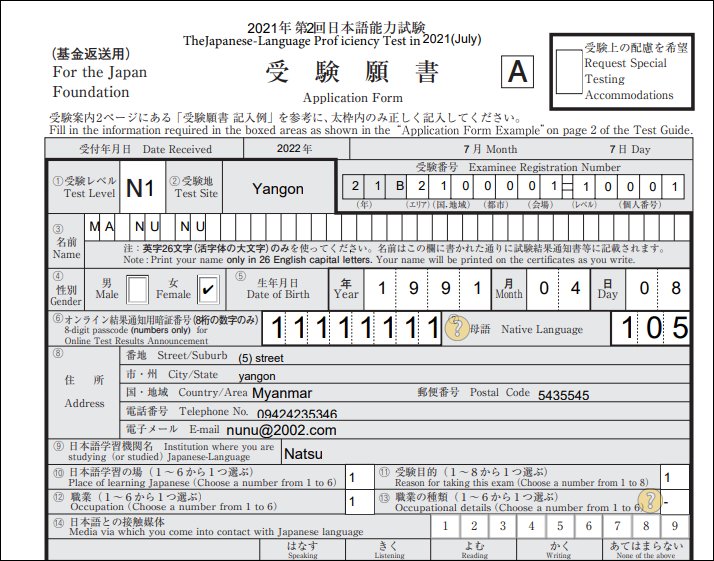
First Page : Application form for Japan Foundation called "A" form.
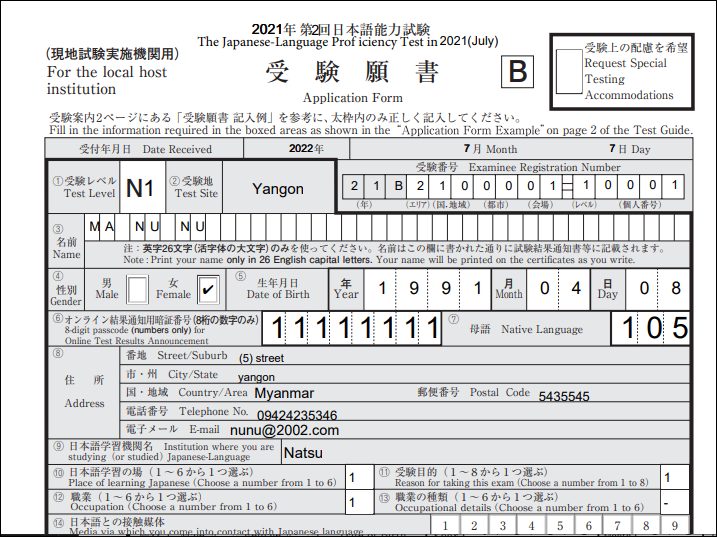
Second Page : Application form for Local host institution called "B" form.
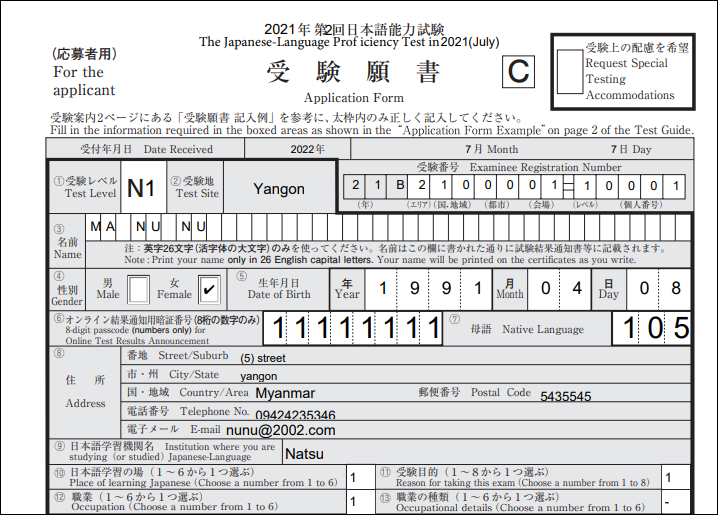
Third Page : Application form for the applicant called "C" form.
Fourth Page : Test Voucher (Copy) include exam rule.
Fifth Page : Test Voucher include exam rule.
Sixth Page : Identity Card.
3.1.6 View the Application Form Report
After clicking "View" button, "Application Form View" page will be displayed.
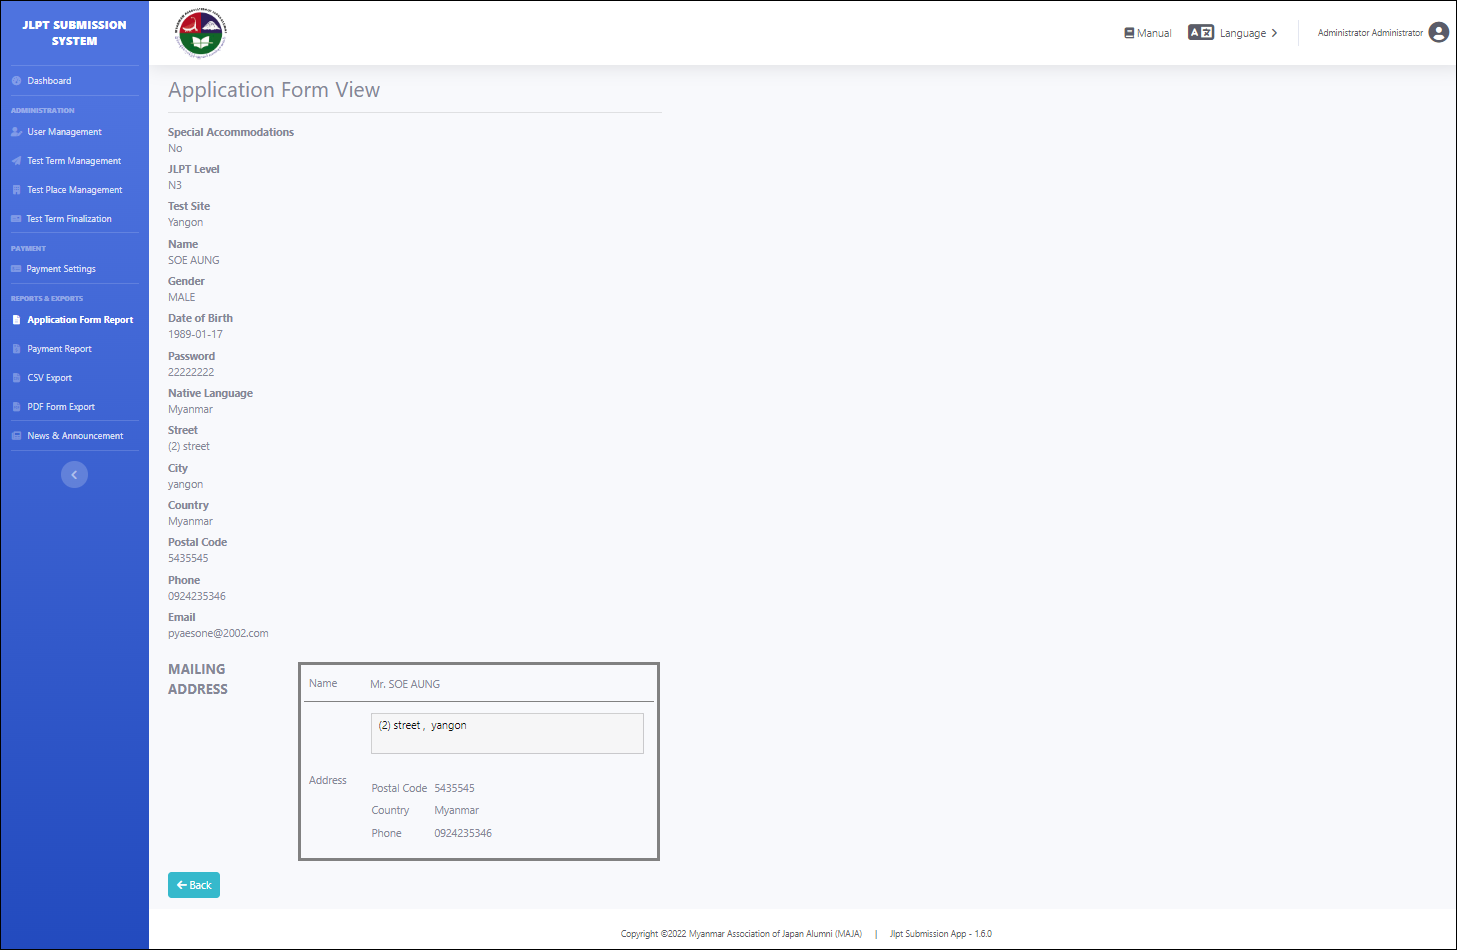
After view the application form, user can go back by clicking "Back" button or user can modify the application form by clicking "Edit" button.
3.1.7 Edit the Application Form Report
When applicant request to MAJA to modify their information. The staff can modify information of applicant here.
After clicking "Edit" button, "Edit Application Form" page will be displayed.
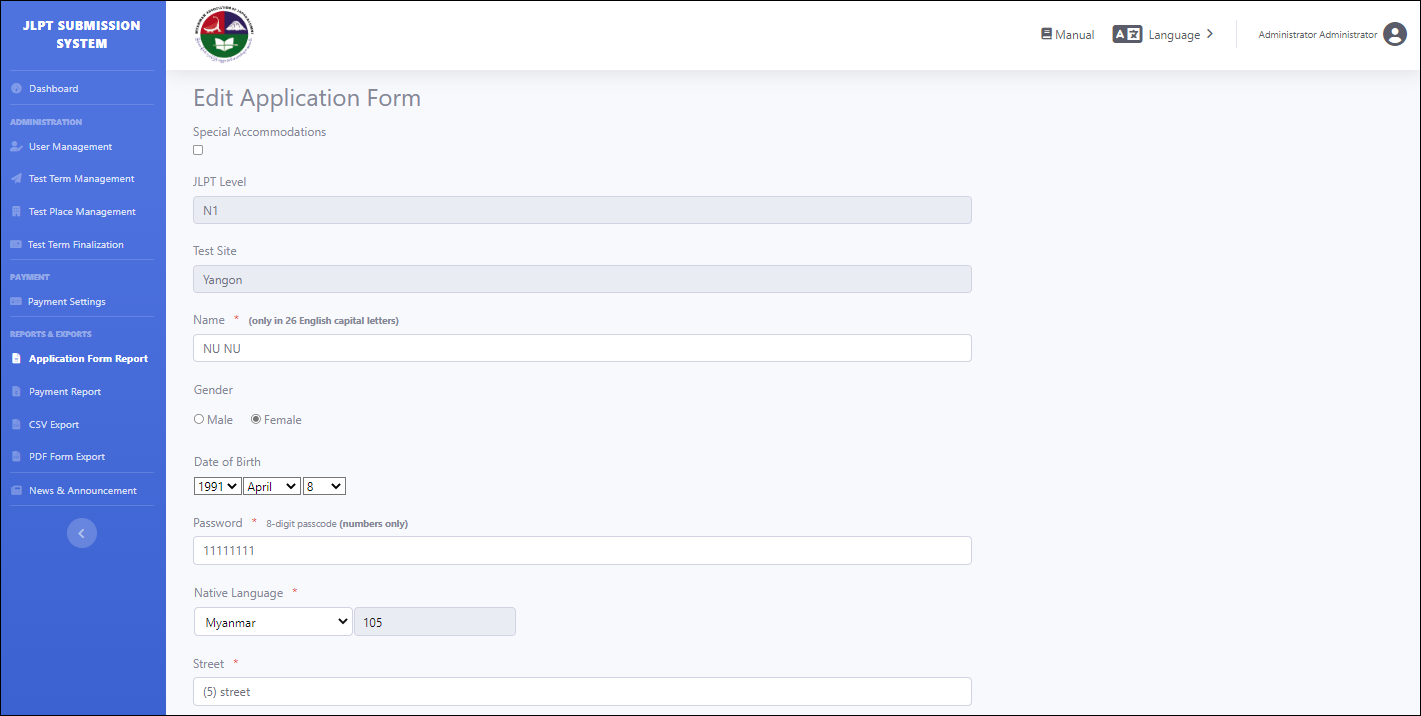
Label name with red star are mandatory/required fields. User must fill data for those fields. Edit Application Form Page:
(1) Special Accommodations : If applicant has a physical disability or other impairments and need Special Testing Accommodations, applicant can check the box.
(2) JLPT Level : User cannot modify jlpt level.
(3) Test Site : User cannot modify test site too.
(4) Name : User can modify applicant name. It can accept 26 characters.
(5) Gender : User can modify gender (Male or Female),
(6) Date of Birth : User can modify date of birth from the dropdown list.
(7) Password : User can modify password which use to view the exam result from online.
Note: User need to memorize this number to see test result.
(8) Native Language : User can modify the native language from dropdown list.
Note: If you change the native language, the code also changes by selecting native language.
(9) Street : User can modify street where applicant lives.
(10) City : User can modify city where applicant lives.
(11) Country : User can select country where applicant lives.
(12) Postal Code : User can modify postal code.
(13) Phone : User can modify phone number of applicant.
(14) Email : User can modify email of applicant.
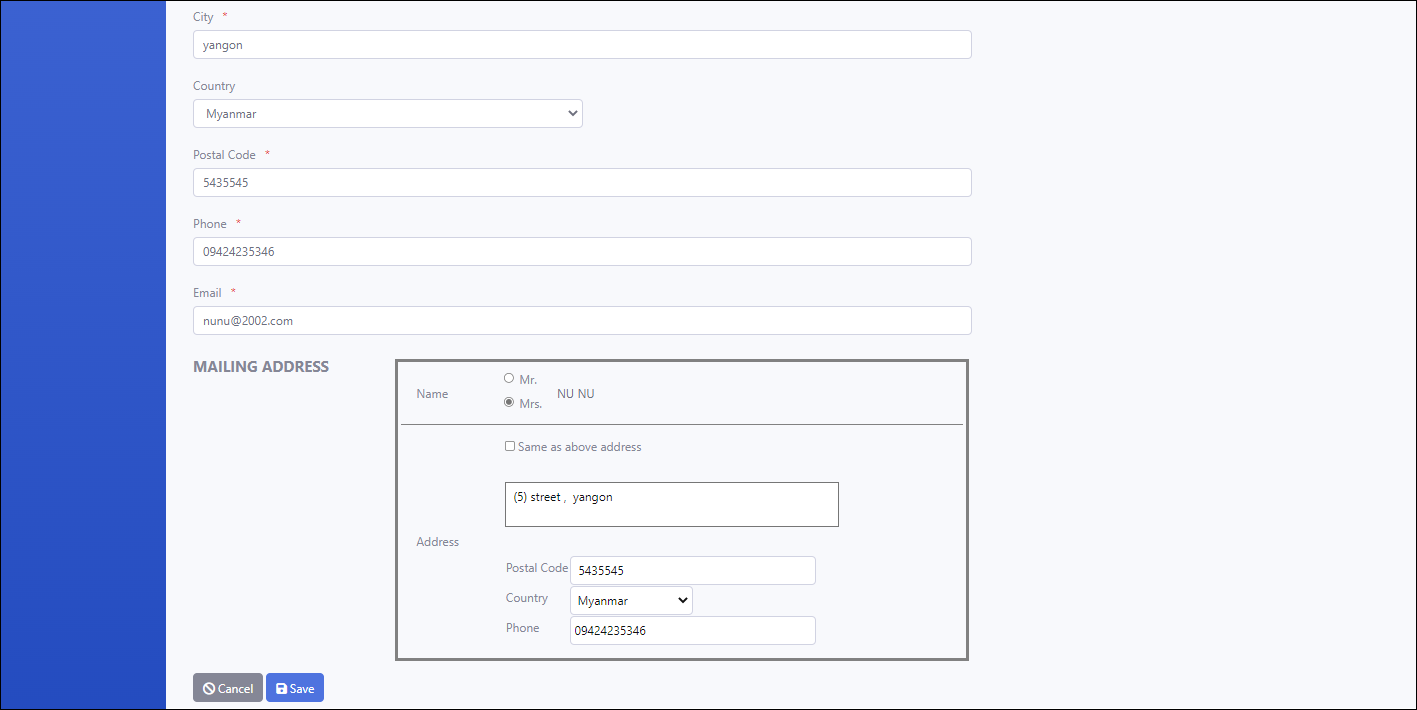
(15) Mailing address (Name) : User can modify gender of applicant.
(16) Mailing Address (Same as above address) : If applicant selected the checkbox of "Same as above address", "Address", "(Postal Code)", "(Country/Area)" and "(Tel)" fields are filled automatically based on the above address information.
If applicant does not select the checkbox, he/she can fill "Address", "(Postal Code)", "(Country/Area)" and "(Tel)" information.
User need to fill the following fields if he/she does not choose "Same as above address".
(17) Mailing Address (Address) : User can fill name of the Street/Suburb and City/State where applicant lives.
(18) Mailing Address (Postal Code) : User can fill postal code where applicant lives.
(19) Mailing Address (Country) : User can select country where applicant lives.
(20) Mailing Address (Phone) : User can fill phone number of applicant.
After editing the application form, user can click "Save" button to save modified data or user can also click "Cancel" button to cancel modified data.
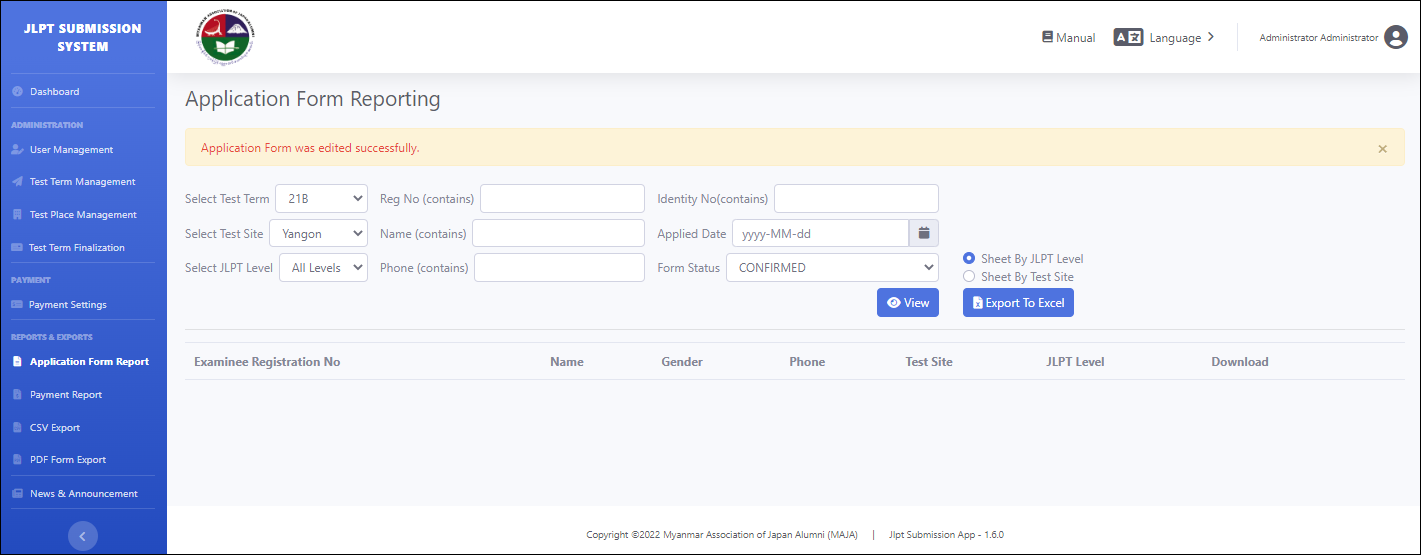
After editing and clicking "Cancel" button, return to Application Form Report main page. And after editing and clicking "Save" button, data will be updated in the system and "Application Form was edited successfully." message will be displayed in Application Form Report main page.
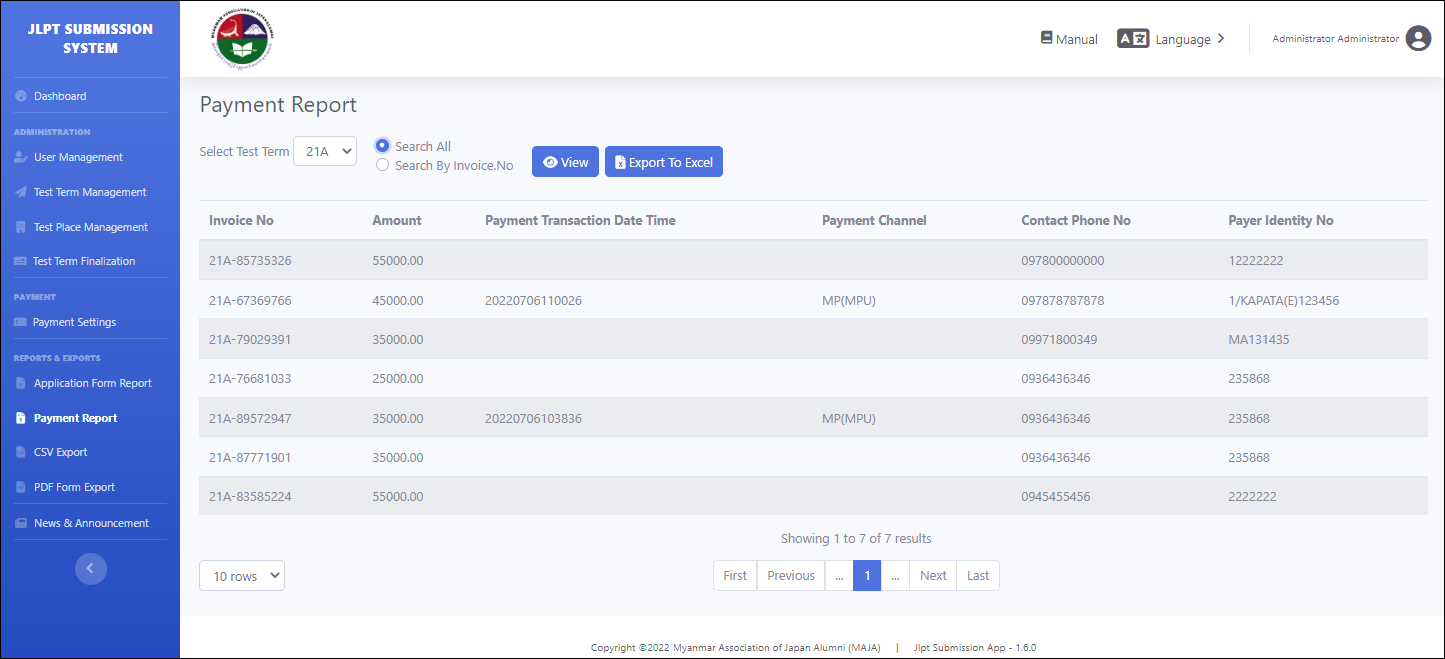
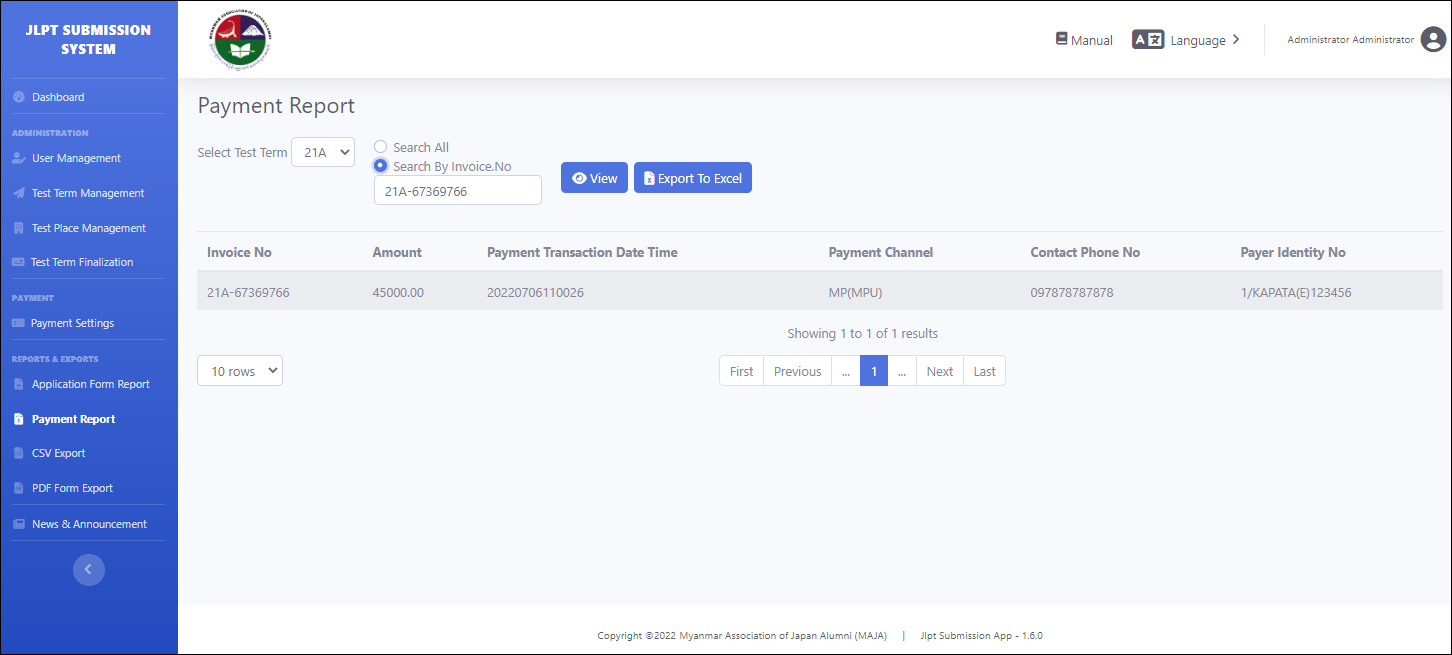
3.2 Payment Report
Administrator can search and export payment information according to test term and invoice number from payment report menu.
In this report, administrator can see Invoice No, Amount, Payment transaction Date Time, Payment Channel , payer Phone No and Payer Identity No.
Administrator can choose the reports number of rows per page from row dropdown list(10 rows, 20 rows and 50 rows).
3.2.1 Search and Export Payment Report
If there is no test term, by clicking "View" button, "There is no test term." message will be displayed.
After defined the test term, user can search by choosing "Search All" and clicking the “View” button, payment reports will be displayed if there are application form which already paid/cancel/expriy fee. That will includes Invoice No, Amount, Payment Transaction Date Time, Payment Channel, Contact Phone No and Payer Identity No.
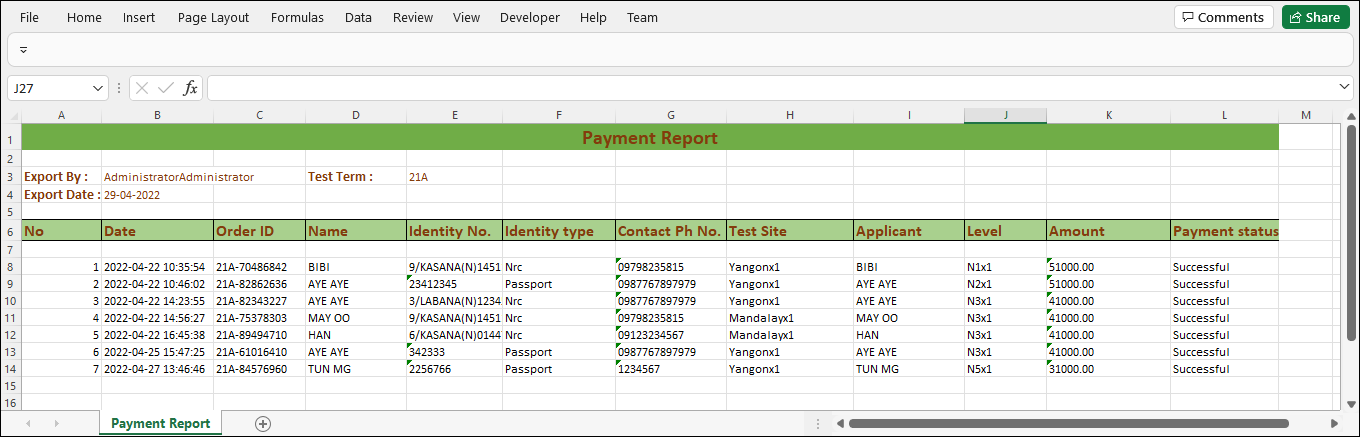
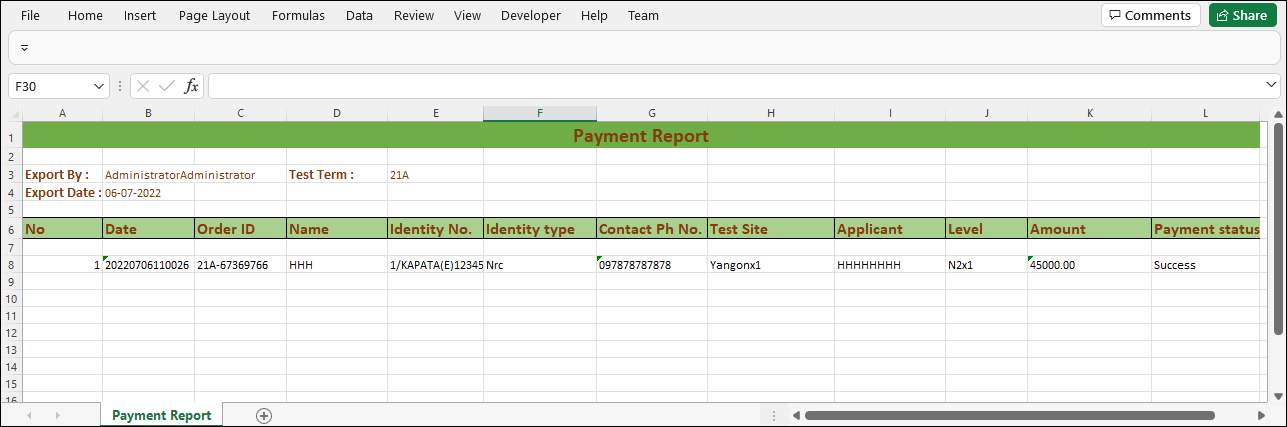
If user click "Export To Excel" button, data will be exported to the excel file and download that file automatically.
And also, administrator can search by choosing "Search By Invoice.No" and clicking the “View” button, payment report will be displayed by Invoice No if there are application form which already applied.
That will includes Invoice No, Amount, Payment Transaction Date Time, Payment Channel, Contact Phone No and Payer Identity No.
Note: User need to remember Invoice No to search report by Invoice No.
By clicking the “Export To Excel” button, payment report file will download automatically with excel format.
Administrator can open downloaded file and can confirm the data.
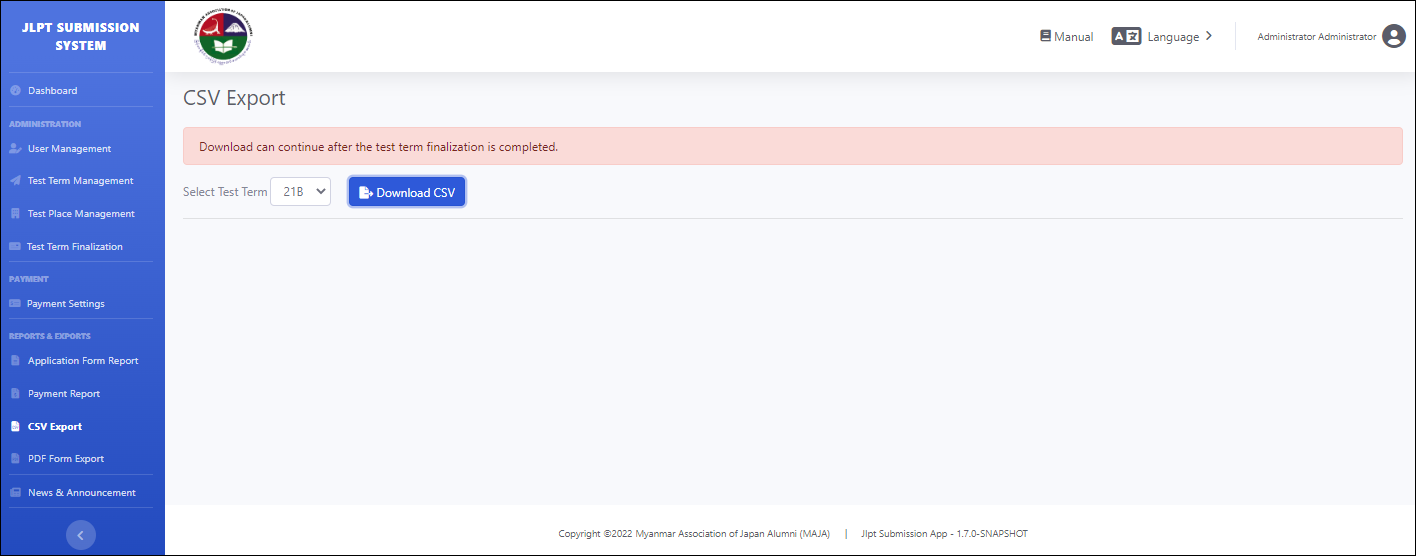
3.3 CSV Export
Administrator can export applicant information according to test term with CSV format for sending to Japan.
3.3.1 Export Reports with CSV Format
If there is no test term, by clicking "Download CSV" button, "There is no test term." message will be displayed.

After defined the test term, if the test term finalization is not finished, user cannot export the reports.
By clicking "Download CSV" button, "Download can continue after the test term finalization is completed." message will be displayed.
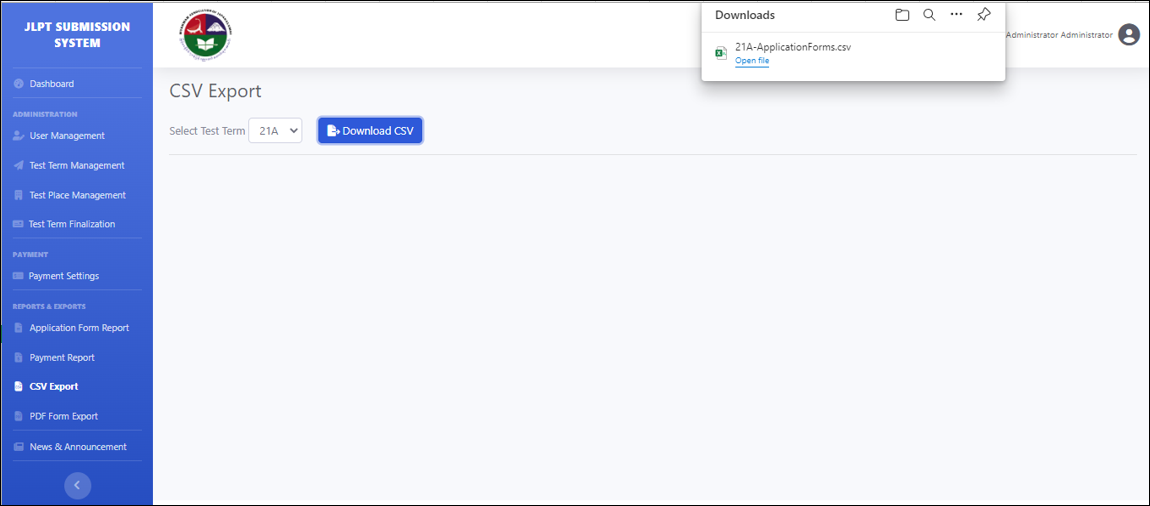
If the test term finalization is completed, by clicking "Download CSV" button, the data file will download automatically. User can open downloaded file and can confirm the data.

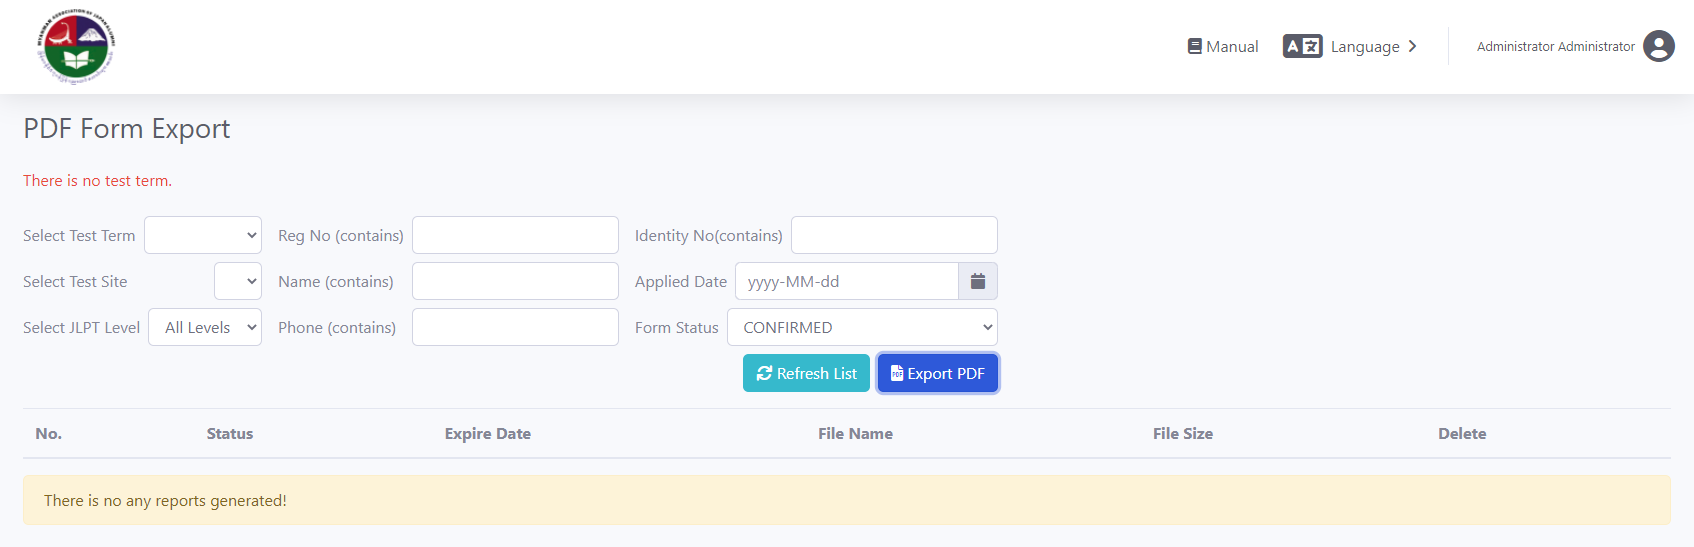
3.4 PDF Form Export
User can also export all application form and test voucher based on selected criteria such as reg no, name, phone number, identity no, applied date and form status.
All application forms and test vouchers will be generated as zip file.
If any report does not exported, "There is no any reports generated!" will be displayed.
3.4.1 Export Reports with PDF Format
If there is no test term, by clicking "Export PDF" button, "There is no test term." message will be displayed.
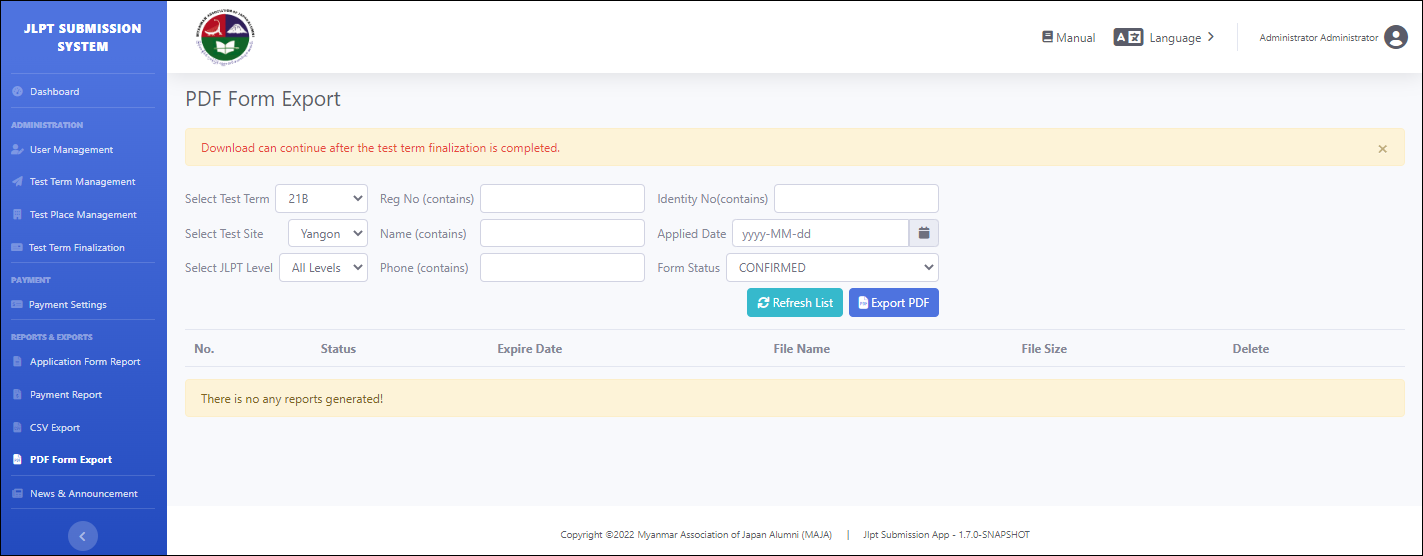
After defined the test term, if the test term finalization is not finished yet, user cannot export the reports.
By clicking "Export PDF" button, "Download can continue after the test term finalization is completed." message will be displayed.
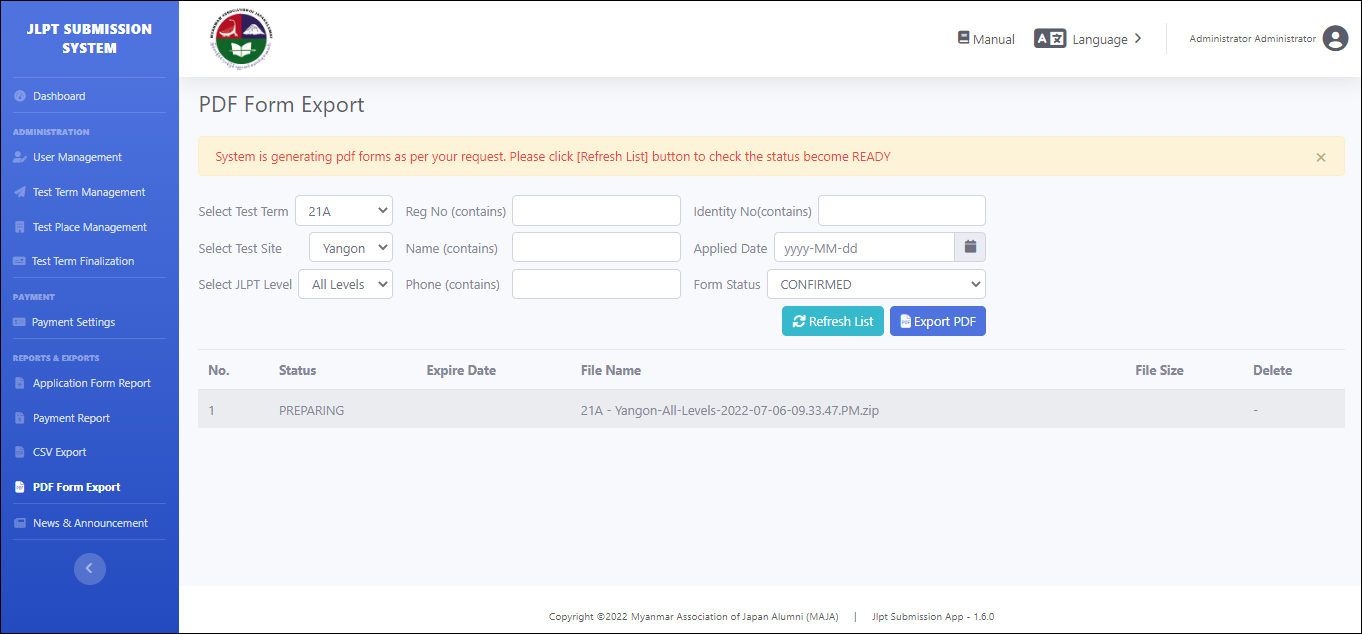
If the test term finalization is completed, by clicking "Export PDF" button, "System is generating pdf forms as per your request. Please click [Refresh List] button to check the status become ready" message will be displayed and system is preparing to generate all form and test term to pdf format. During that state, system will display "PREPARING" at the status column.
That will includes No., Status, Expire Date, File Name, File Size and Delete.
After clicking “Refresh List” button, if pdf file are ready state, the system will display "READY" at the Status column and the generated information such as Status, Expire Date, File Name, File Size and Delete.
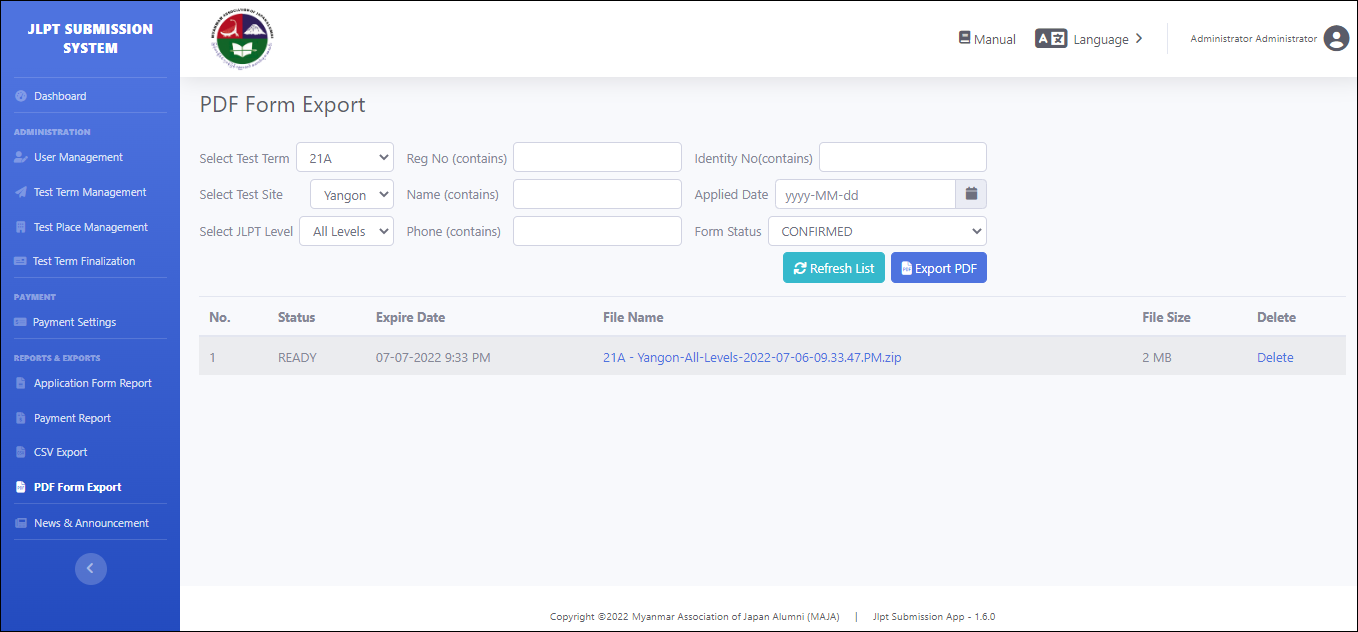
If click on the zip file, that file will be downloaded automatically. In the zip file, user can see folder with three (3) levels. At first level, user can see folder name with test term. In the test term folder, user can see test site folder. In the test site folder, user can see folder name with each JLPT exam level which based on criteria of "Select JLPT Level". In each JLPT exam level, there are PDF files which related with JLPT level. Example : In the N1 folder, user can see application form of N1.

In one PDF file, there must be six (6) pages.
First Page : Application form for Japan Foundation called "A" form.
Second Page : Application form for Local host institution called "B" form.
Third Page : Application form for the applicant called "C" form.
Fourth Page : Test Voucher (Copy) include exam rule.
Fifth Page : Test Voucher include exam rule.
Sixth Page : Identity Card.
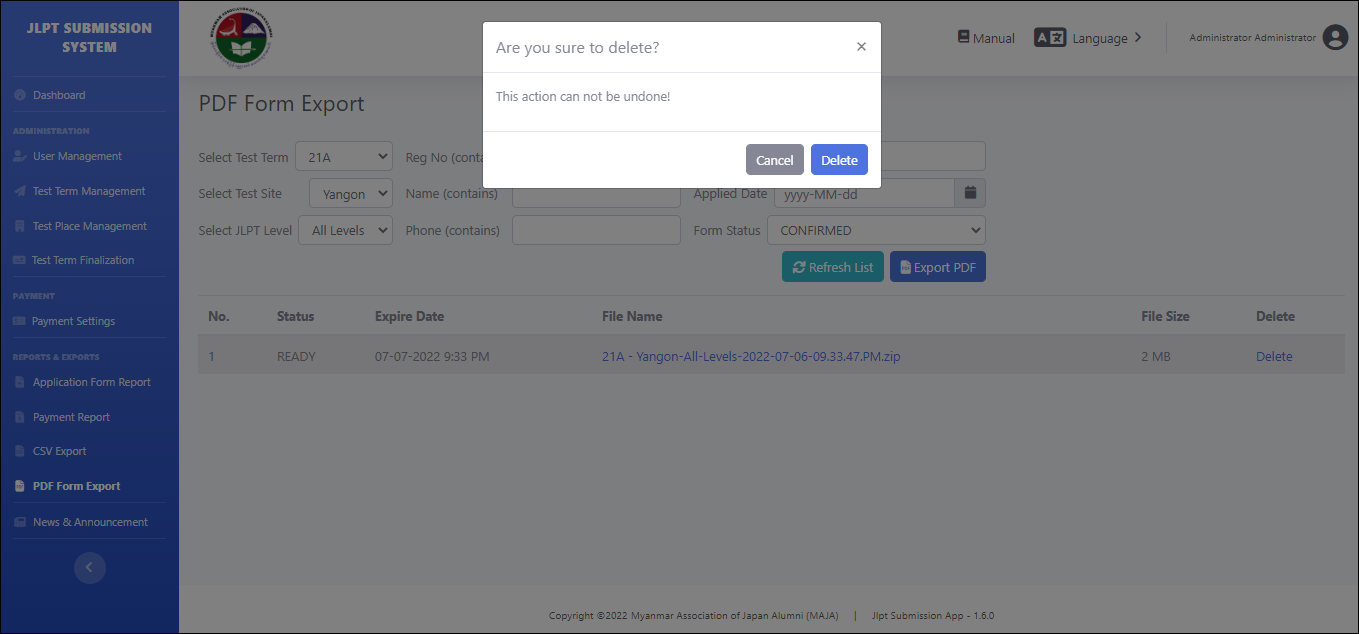
By clicking on “Delete” button, "Are you sure to delete" pop-up will be displayed with "Cancel" and "Delete" button.
User can click "Cancel" button if he/she does not want to delete zip file and information.
User can click "Delete" button if he/she want to delete zip file and information.
After clicking “Delete” button, "Report file has been deleted as per your request." and "There is no any reports generated!" messages will be displayed.
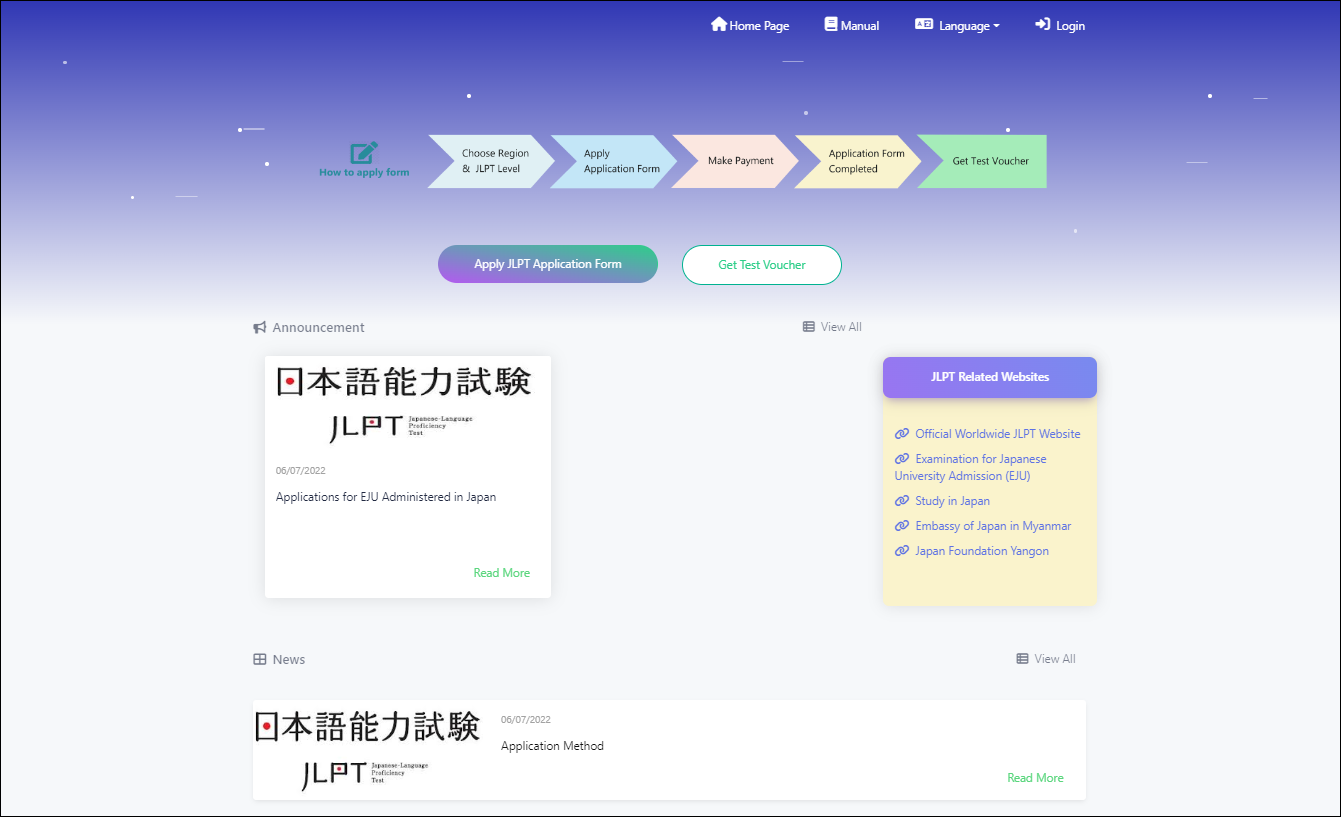
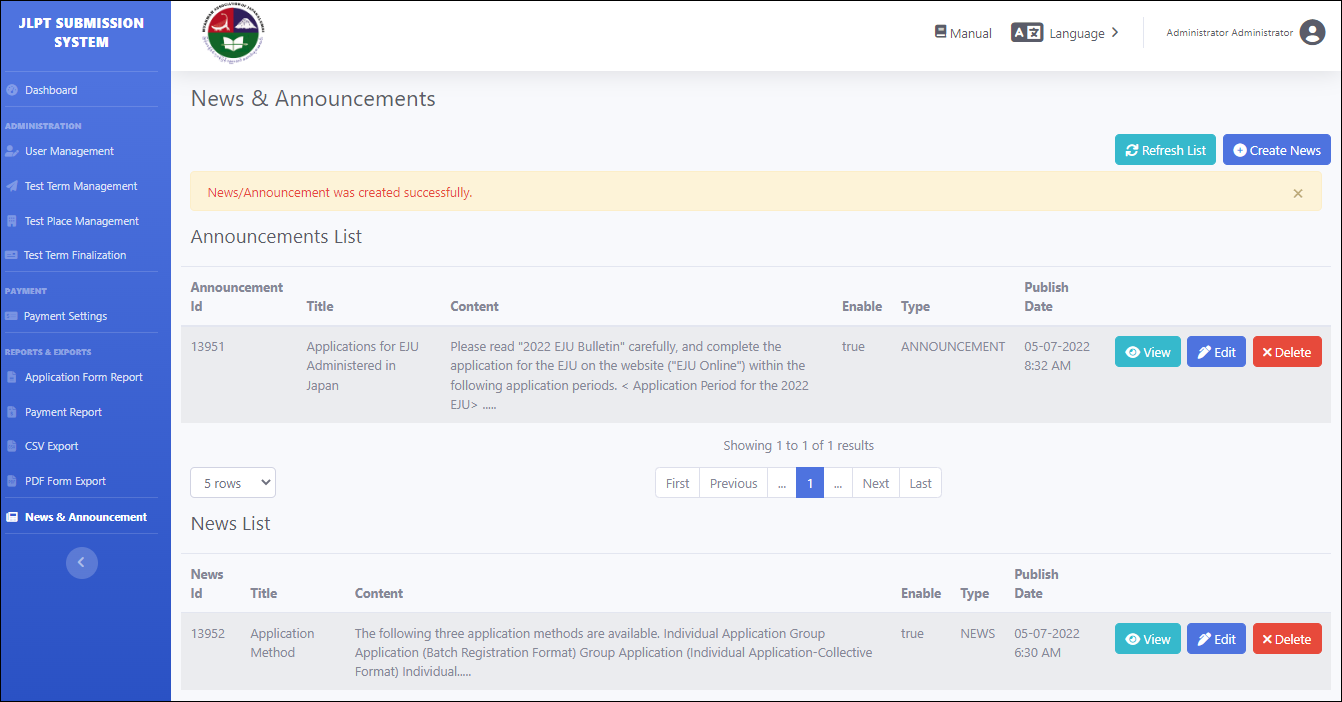
4. News & Announcements
If MAJA want to public news and annoucements, MAJA can create those in this page. All news and announcements that have been created in this page will be displayed at the "Home Page" of applicant site.
To manage news and annoucements, user need to click "News & Annoucements" link from navigation menu.
At the "News & Annoucements" page, user can see two (2) parts.
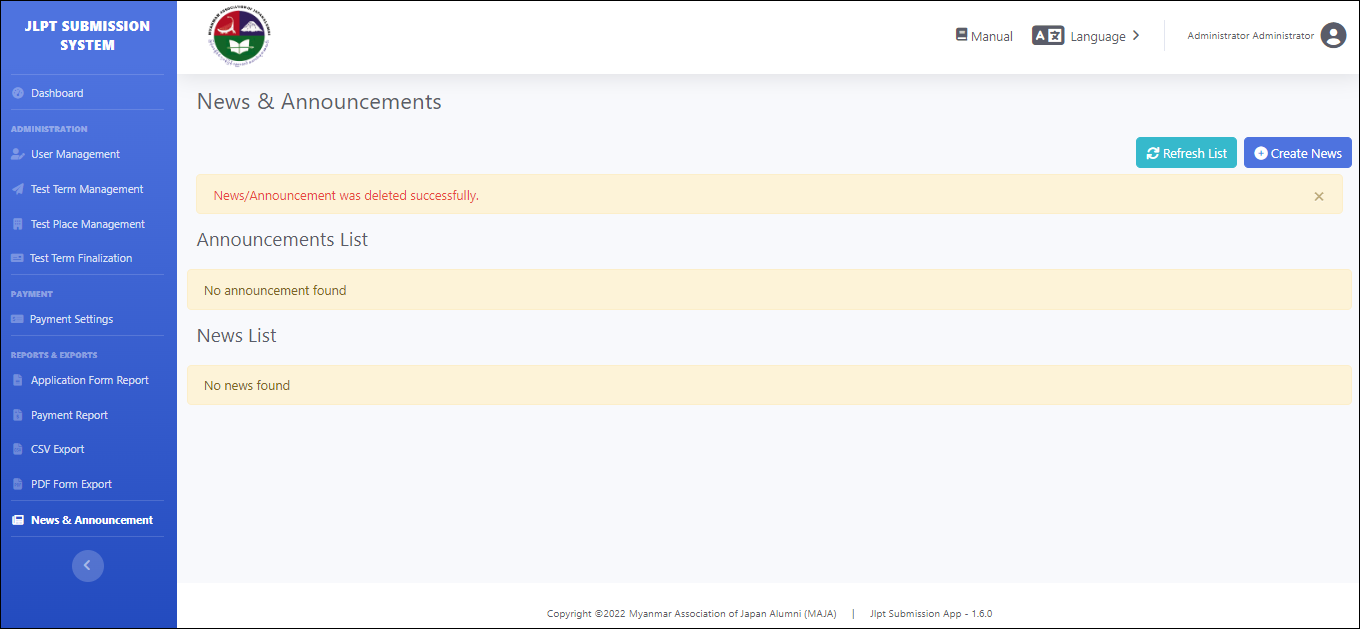
(1) Announcements List which display all annoucements. If there is no announcement, display "No announcement found" message.
(2) News List which display all news. If there is no news, display "No news found" message.
User can create new announcement and news by clicking "Create News" button. User can also click "Refresh List" button to refresh the data from "Announcements List" and "News List".
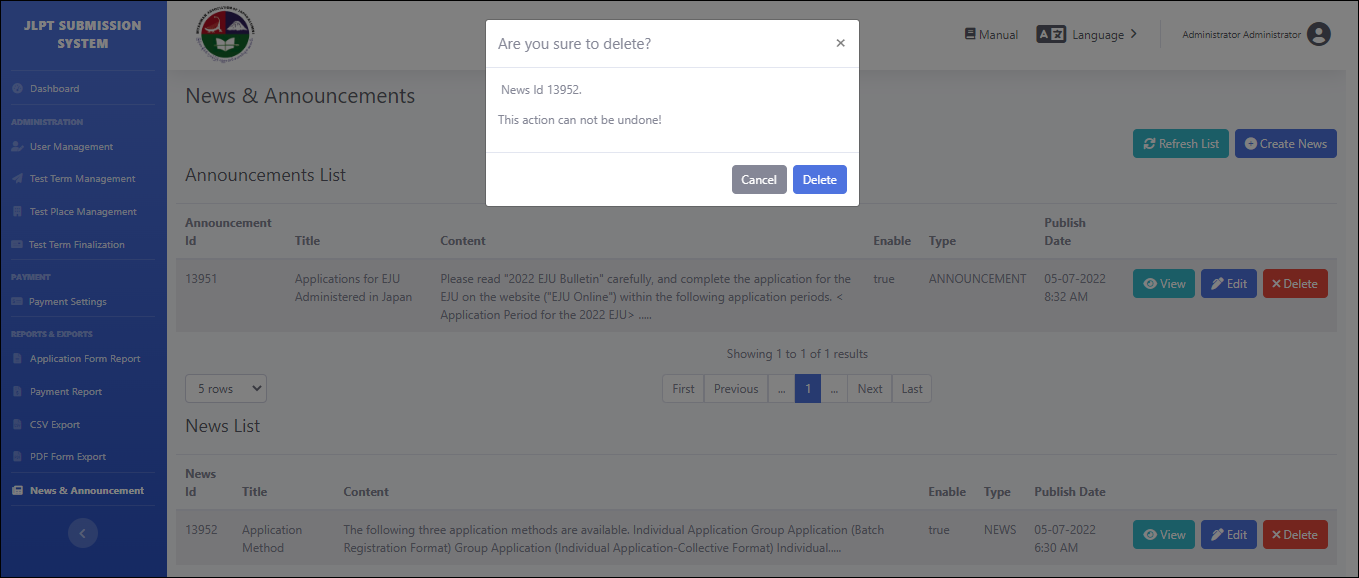
And then, if there are any mistake on news and announcements, user can also update/delete by clicking "Edit"/"Delete" button.
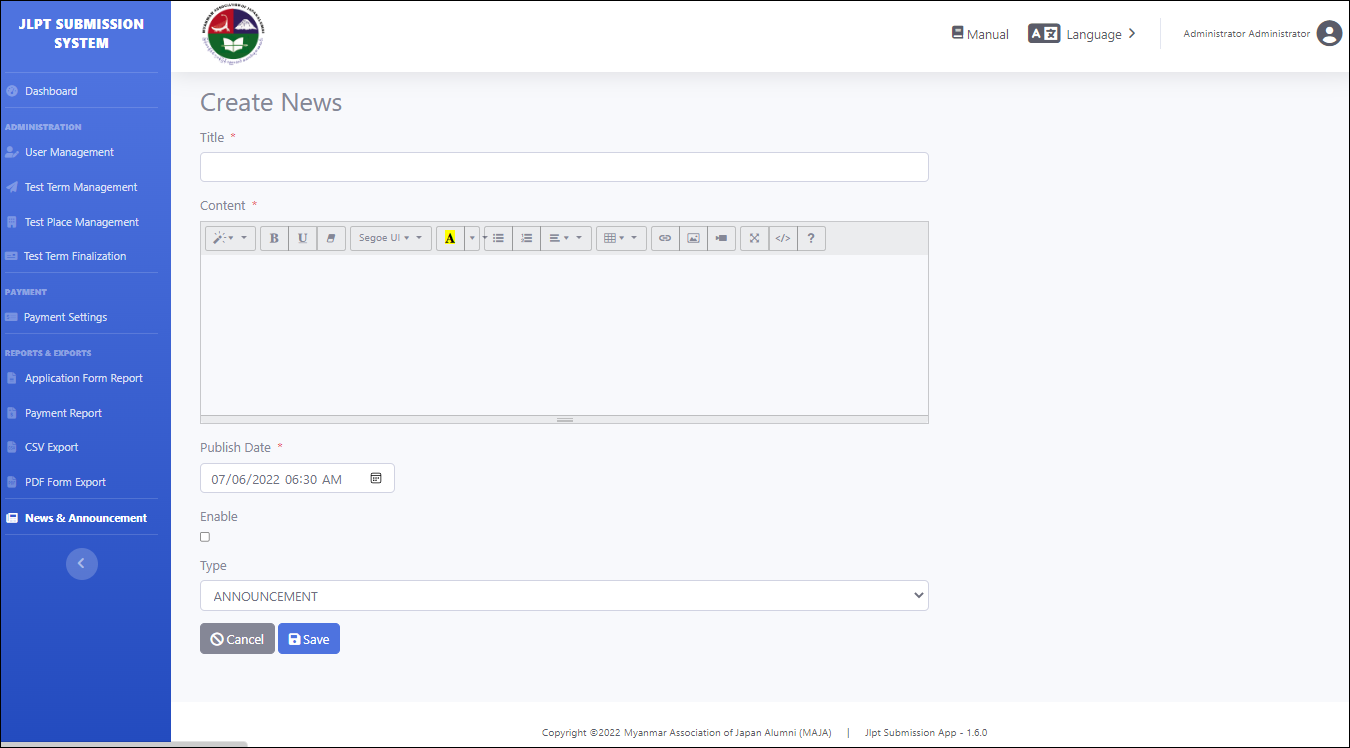
After clicking “Create News” button, "Create News" page will be displayed.
4.1 Create News
User need to fill the following fields to create news and announcements.
Lable name with red star are mandatory/required fields and user need to fill those fields.
(1) Title : User need to fill the title name of announcement or news.
(2) Content : User need to fill the content of announcement or news.
(3) Publish Date : User need to choose the public date by clicking on date picker. Note: If "Publish Date" is today date, the created news or announcement will be displayed at the "Home Page" on tomorrow. User can also choose previous date for this field.
(4) Enable : User has to check this field to be displayed this news or announcement at the "Home Page". Otherwise, it will not be displayed.
(5) Type : User can choose "ANNOUNCEMENT" or "NEWS" from dropdown list.
After filling the above fields, user can click "Save" button to save the data. After the data are saved successfully, "News/Announcement was created successfully." message will be displayed and go back to "News & Announcement" page.
User can also click "Cancel" button to cancel the data and go back to "News & Announcement" page.
After creating announcement, the data will be displayed at the "Announcement List" and user can view, edit or delete the announcement by clicking the related button.
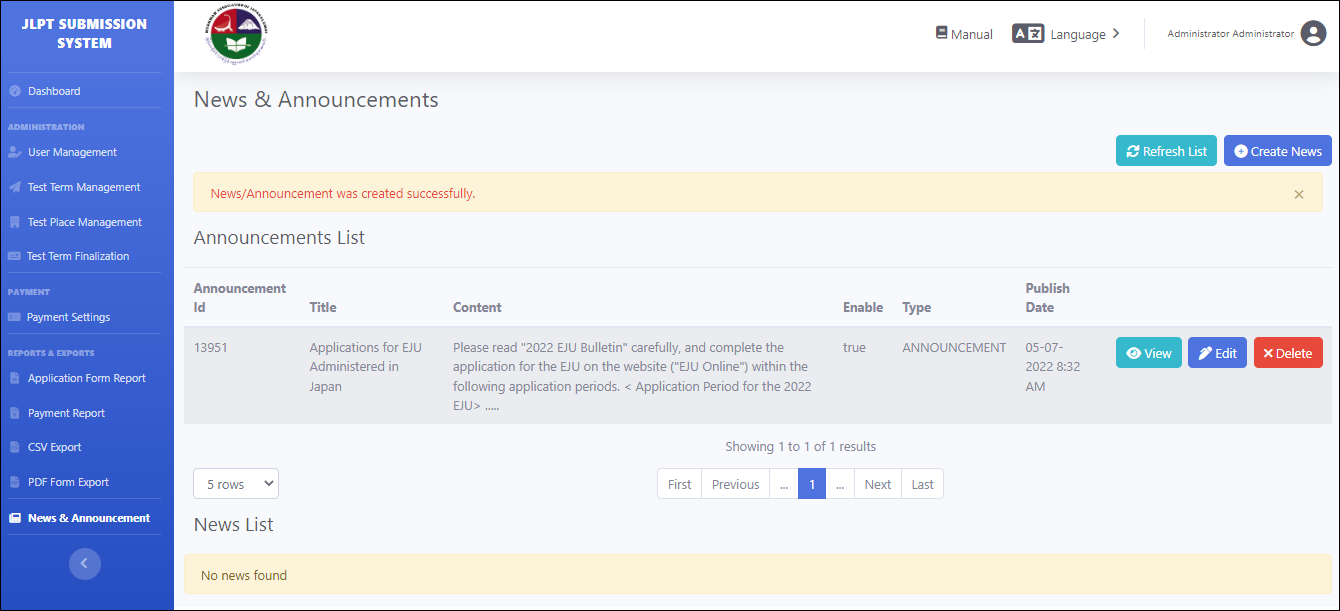
After also creating news, the data will be displayed at the "News List" user can view, edit or delete the news by clicking the related button.
For the old news and announcements, user can view, edit and delete by clicking related button.
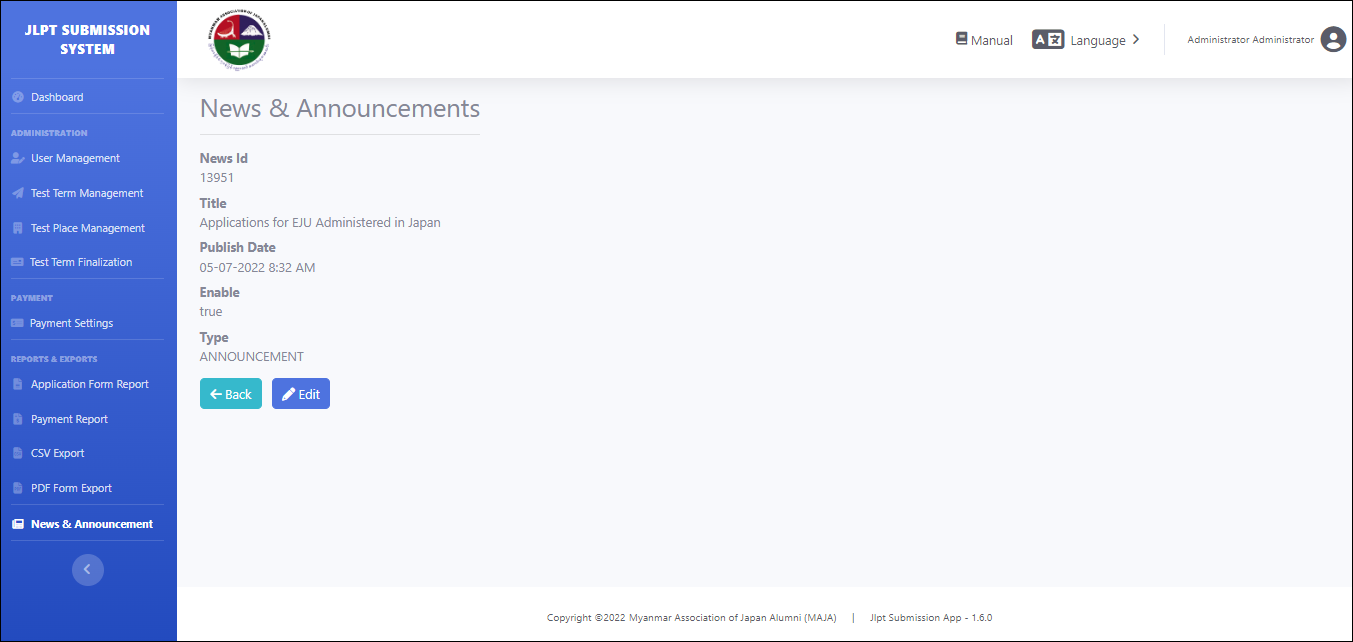
After clicking “View” button, "News & Announcements" view page will be displayed. From that page, user can click "Edit" button to modify the data or user can go back to "News & Announcements" main page by clicking "Back" button.
After clicking “Edit” button, "Create News" modify page will be displayed. In this page, user can modify all fields except "News Id".
After clicking “Delete” button, "Are you sure to delete?" popup will be displayed.
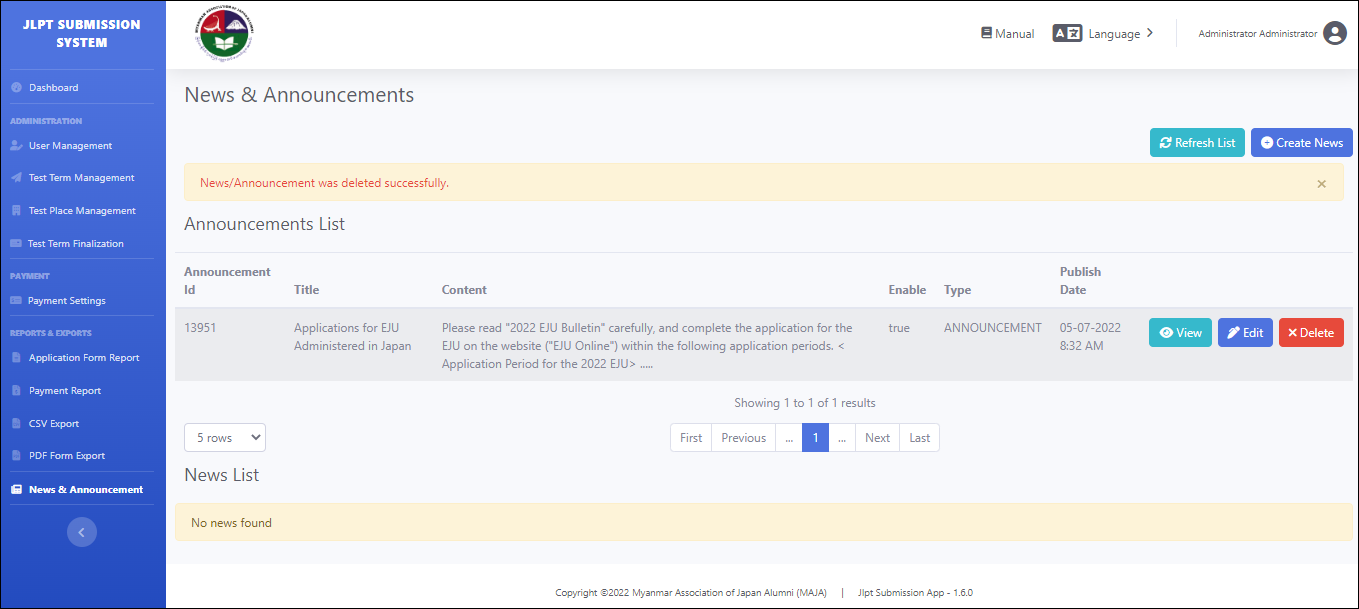
After deleting, "News/Announcement was deleted successfully." message will be displayed.
After create news and announcement, that will be shown in Home Page.